


Ever wondered what makes a container tick? In this article, we’ll take a deep dive into containers and answer this question.
You probably already know the common definition of a container, "a lightweight Virtual Machine for packaging software amongst other things". In a previous article, I gave a general overview of what a container is and why it’s relevant. If you are not familiar with containers yet it’s a good place to get started.
Pre-requisites
This article will be quite technical and might not be considered beginner friendly but I will try to help you digest it all. To follow along you'll need the following:
Access to a Linux Virtual Machine (I will be using an Ubuntu 22.04 VM from AWS). Please don’t use your personal computer to practice if you can help it.
Basic Linux knowledge
Docker is installed on your VM. Check out the official docs for this.
Introduction
The Open Container Initiative formed by Docker and CoreOs defines the specifications for containers. There are different types of containers according to their specifications but the most commonly used is the Linux container.
What is a Linux container?
A Linux container is essentially an isolated process running on a host machine. It is an OS-level virtualization technique. This means it provides process isolation to the extent of running multiple operating systems on a single host while sharing its (the host’s) kernel. Unlike Virtual machines which provide virtualization by using hypervisors to provide and manage multiple guest kernels on top of the host kernel allowing the guest kernels to manage their virtual environments as though they were their own bare metal host.
The keyword here is "isolation". In the way of Linux, processes can spawn children and become parents via a procedure called forking. The Linux container operates as a parent process which provides the isolation required for subsequent child processes running in the container environment. You can think of it as the init.d (starter process on most Linux distros) of a container. Once it fails, the container is gone. We’ll talk more about this as the article progresses.
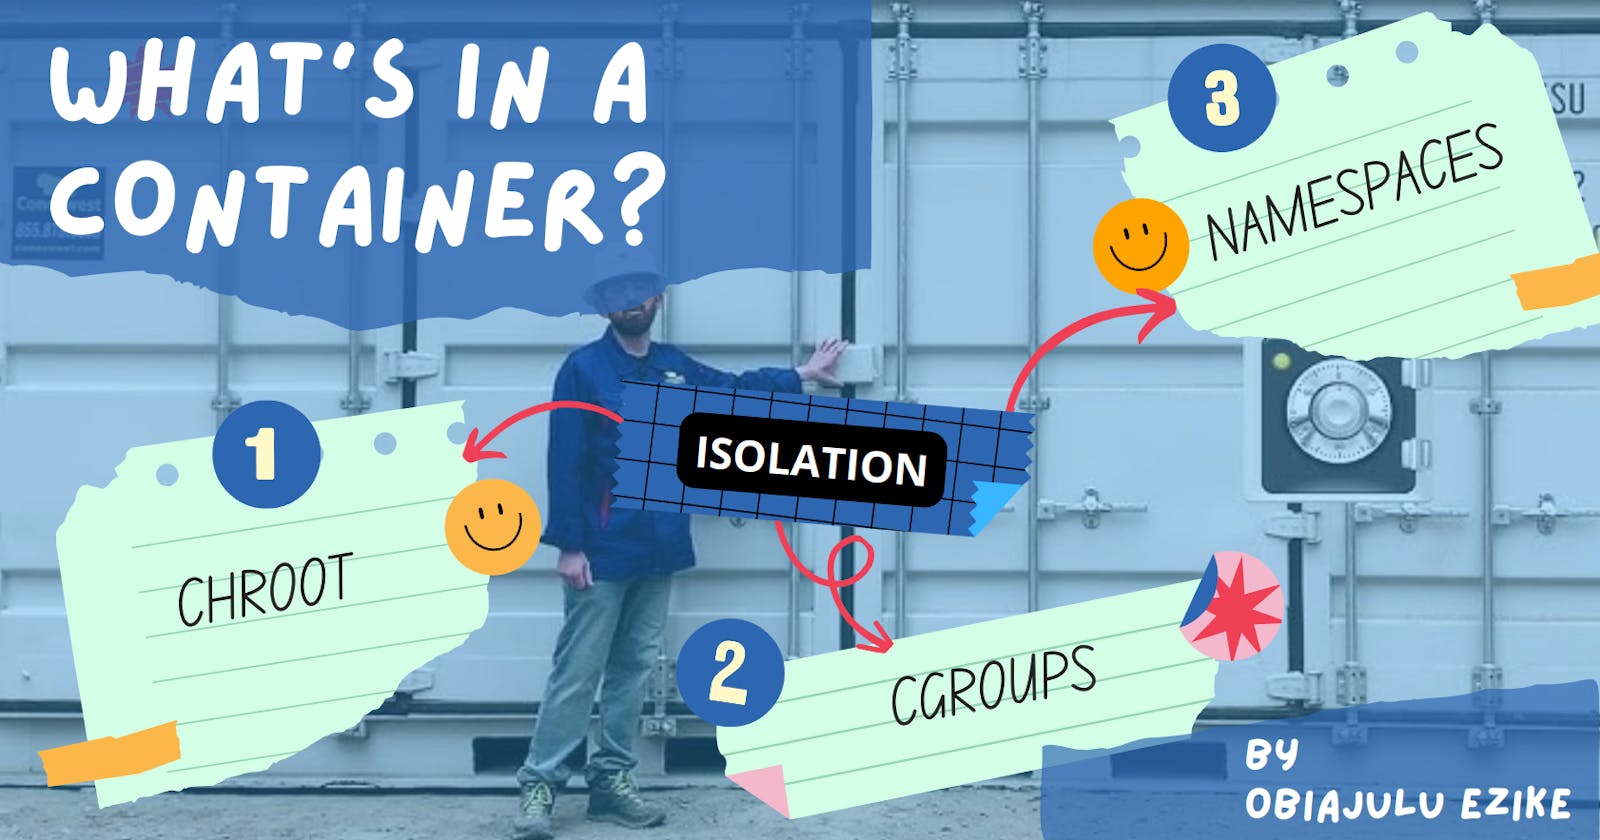
To understand how Linux containers achieve this isolation we must first understand 3 Linux concepts
Chroot
Cgroups
Namespaces
CHROOT
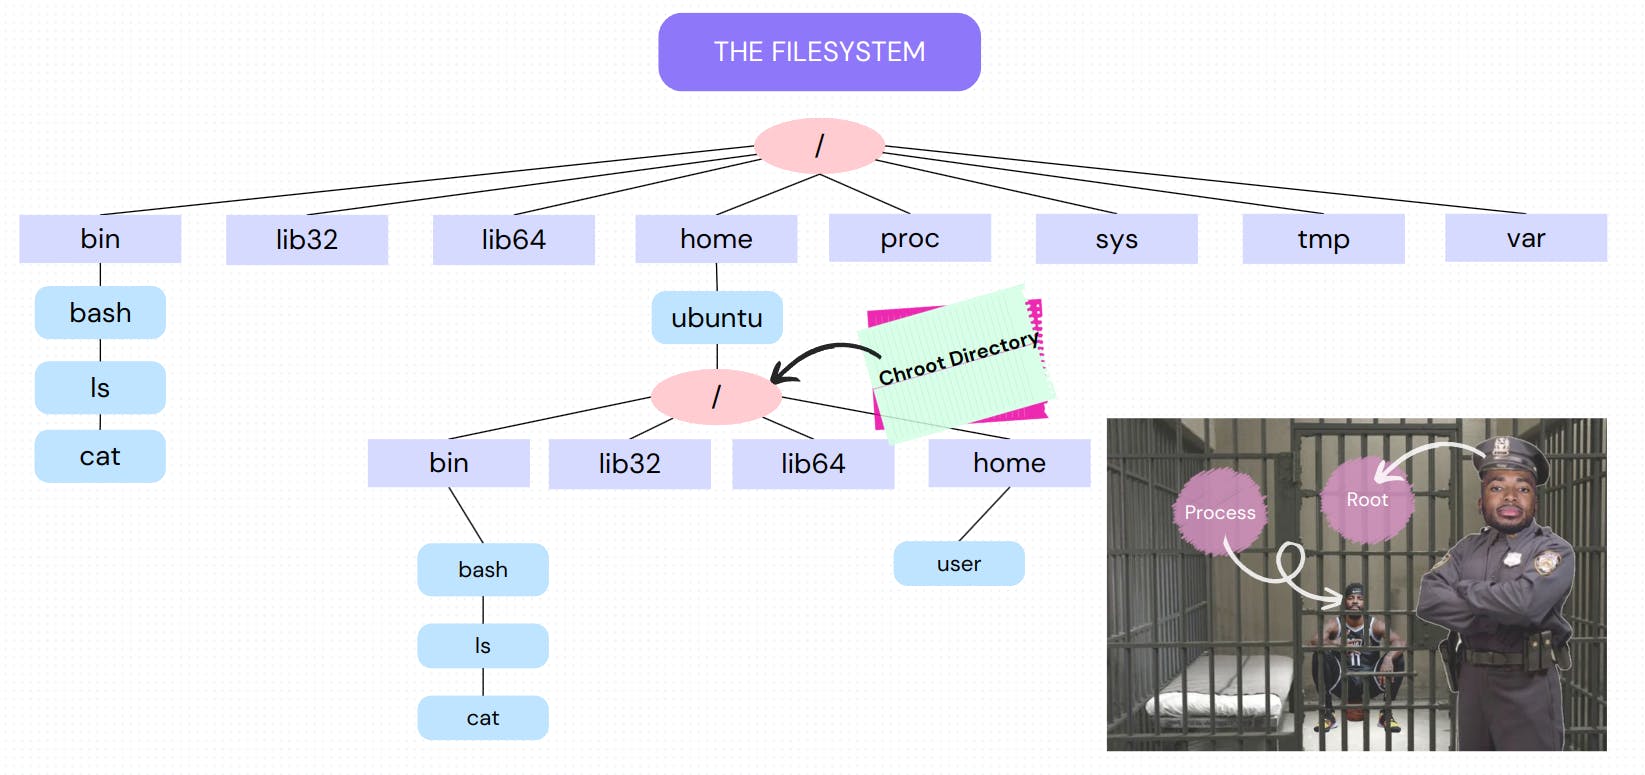
This is a Linux command line tool that allows you to change the apparent root directory. This means that a sub-directory of the main filesystem becomes the new ceiling (root) of the filesystem for all subsequent processes run in the chroot space.
To achieve this, you must set up the new root filesystem to include at least a shell and its dependencies so that a shell session can be sustained. If this is not done, chroot will throw an error. Chroot starts and runs a specified process in a specific sub-tree of the filesystem. If you don’t pass any commands (process initializers) it will look for $SHELL in the chroot directory and attempt to run it. If it cannot find it, an error is thrown.
The following images illustrate how a chroot space might be created.

chroot requires CAP_SYS_CHROOT capabilities so we have to use sudo or become superuser. We also need to copy over relevant binaries and their libraries to the chroot directory.

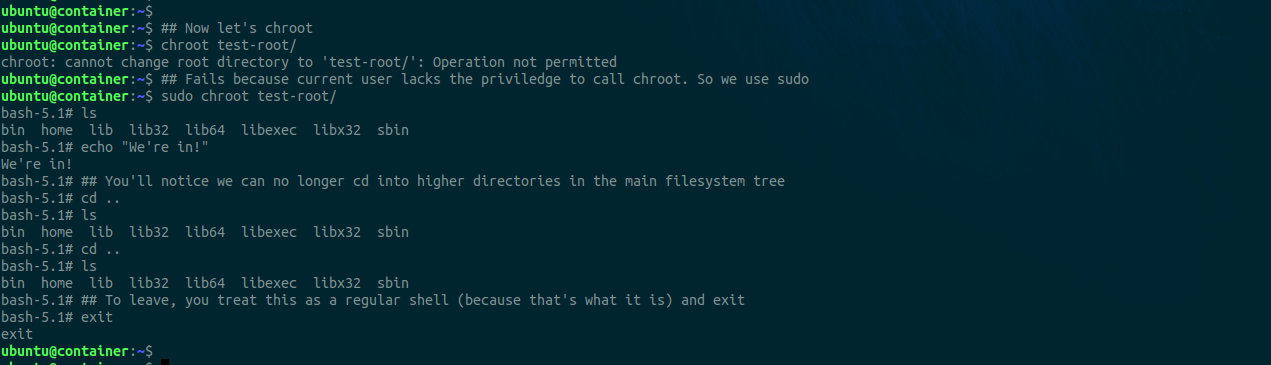
You’ll notice how this behavior is similar to that seen in containers. Once you’re in, you can’t access directories outside unless you exit the chroot or container space.
Chroot allows system administrators to section off parts of the filesystem and isolate processes and users in them. These processes and users will not be able to see above their apparent ceiling (root directory) effectively jailing them.
NAMESPACES
According to the Linux manual, see man 8 namespaces
"A namespace wraps a global system resource in an abstraction that makes it appear to the processes within the namespace that they have their own isolated instance of the global resource. Changes to the global resource are visible to other processes that are members of the namespace but are invisible to other processes. One use of namespaces is to implement containers."
Basically, namespaces allow you to define scopes/instances of system resources which can then be applied to processes. A process can only exist in a single instance of a particular namespace. Namespaces can also be shared across multiple processes.

There are 6 major namespaces as outlined in the man pages
| Namespace | Flag (syscall identifier) | Page | Isolates |
| Cgroup | CLONE_NEWCGROUP | cgroup_namespaces(7) | Cgroup root directory |
| IPC | CLONE_NEWIPC | ipc_namespaces(7) | System V IPC, POSIX message queues |
| Network | CLONE_NEWNET | network_namespaces(7) | Network devices |
| Mount | CLONE_NEWNS | mount_namespaces(7) | stacks, ports, etc. |
| PID | CLONE_NEWPID | pid_namespaces(7) | Process IDs |
| Time | CLONE_NEWTIME | time_namespaces(7) | Boot and monotonic clocks |
| User | CLONE_NEWUSER | user_namespaces(7) | User and group IDs |
| UTS | CLONE_NEWUTS | uts_namespaces(7) | Hostname and NIS domain name |
By default, the kernel creates a default namespace for all activities in the userland. However, System admins might run into scenarios when isolation of processes is imperative so they have to create new namespaces. These namespaces are instantiated by making system calls (syscalls) to the kernel which manages processes and system resources. It is the kernel’s job to keep track of namespaces and enforce the scoping of processes to their proper namespaces.
To run processes in custom namespaces, you’d typically use one of the following APIs:
unsharesyscall creates a new namespace and runs the calling process inside of itclonesyscall is primarily used for creating processes. However, it can also be used to create namespaces in which these processes would run by passing the flags in the table above.setnssyscall allows you to attach a process to a previously existing namespace.
The above invokes syscalls to facilitate their functions.
The namespaces of a process can be seen by inspecting the ns directory of the process in the /proc directory. /proc is where Linux keeps files pertaining to running processes including their states, file descriptors, namespaces, and much more.
For example, you can see the namespaces in which your current shell is running by running the command
readlink /proc/$$/ns/*
readlink is used here because the files in these directories are symbolic links. Realink allows us to follow those links to the final destination.
$$ expands to the process ID of the current shell executing the command
* expands into all the files in the ns directory
The output is shown below
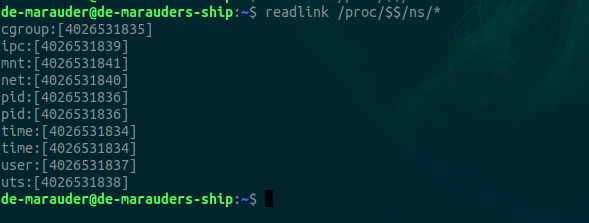
The numbers in square brackets represent the inode numbers (Linux file unique identifiers) for the namespaces.
Now let’s talk about the different namespaces and how they relate to containerization.
Mount Namespaces
This namespace allows the Linux kernel to isolate mount points. Mounts allow the extension of the host filesystem by attaching external filesystems to specified mount points (directories in the host filesystem). This is how the computer is able to read data from external storage. The filesystem in the storage is mounted to a directory on the computer’s filesystem effectively extending it.
The mount namespace allows us to isolate this behavior so that mounts in a particular namespace are not reflected in another namespace. Let’s see this in action. We are going to create a new mount namespace and mount a new tmpfs mount to /tmp
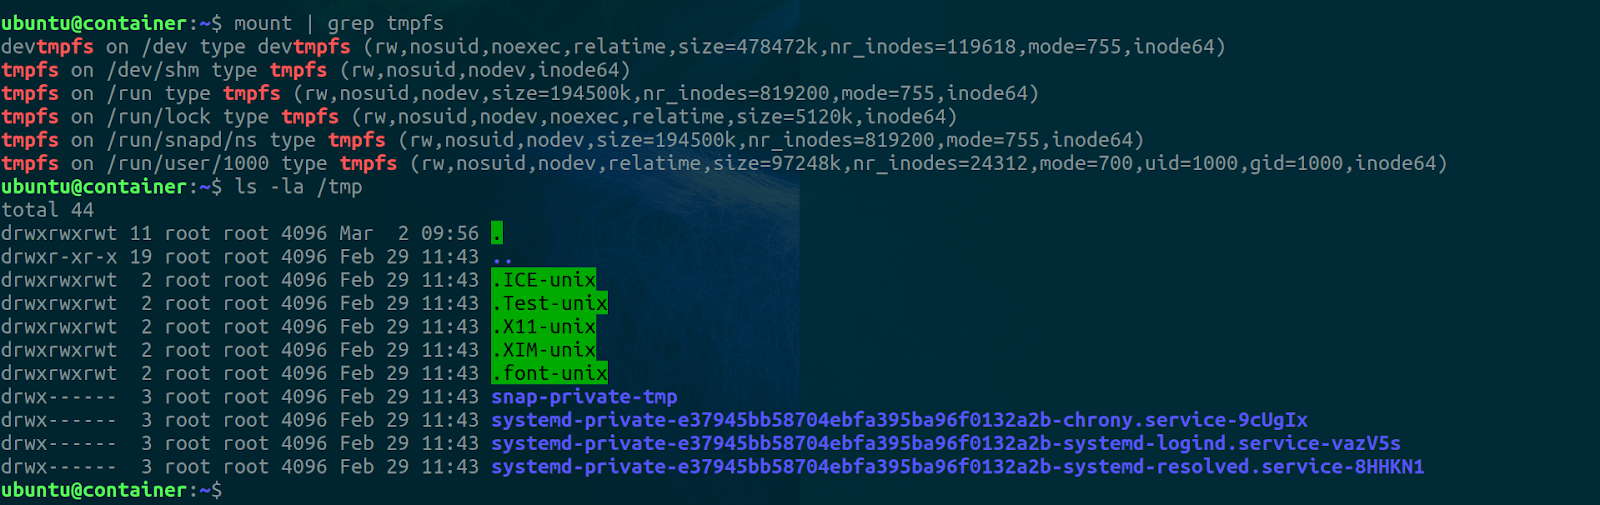
First of all, we’ll get all current tmpfs mounts in the native mount namespace and also view the contents of the /tmp directory. To do this we run the mount command like so, grepping for tmpfs in the results from the mount command which lists all available mounts in the namespace.
mount | grep tmpfs
ls -la /tmp
The result should be something like this,
In a different terminal session, we’ll first we’ll start up a new namespace, check the current tmpfs mounts, and then mount a new mount of type tmpfs to /tmp
sudo unshare -m
ls -la /tmp
mount | grep tmpfs
mount -t tmpfs new_tmpfs_mount /tmp
ls -la /tmp
mount | grep tmpfs
unshare is called with sudo because it requires elevated privileges. It performs a syscall to the kernel and tells it to create a new namespace and run the specified process in it. Since no process was specified, $SHELL which resolves to the bash shell (/bin/bash) is executed. The -m flag tells unshare that the namespace to create is a mount namespace.
Now we are operating in a new mount namespace. Inspecting the /tmp directory shows that it’s currently the same as the one in the native mount namespace. We can also inspect all the current tmpfs mounts.
To mount a new tmpfs mount to /tmp, we use the mount command but specify the -t flag to tell it the type of the mount then we name the mount and specify the mount point. There are different types of mounts like nfs, fat32, btrfs, proc, tmpfs, sysfs etc. We won’t be going into their details in this article but they are all different types of filesystems. You can check out the mount manpage for more information.
If we check the /tmp directory now we’ll find that it’s empty and the results of grepping for tmpfs mounts show the addition of a new mount called new_tmpfs_mount. The results can be seen below,
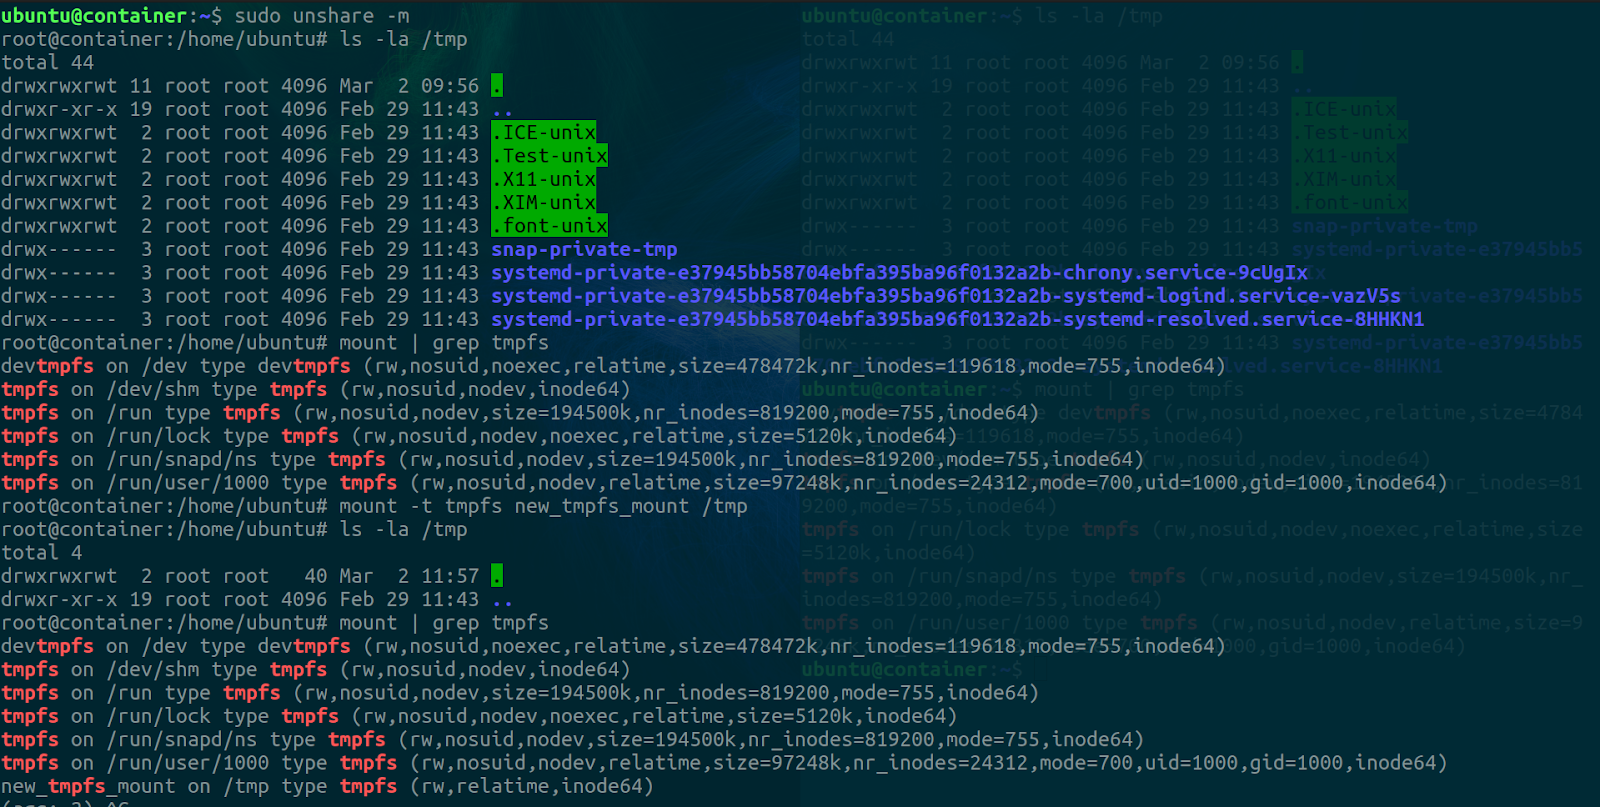
Going back to the other terminal session and checking the /tmp directory and mounts in the native namespace, we’ll find that the results are unchanged despite the results we saw in the new mount namespace we created.
This shows how mount namespaces can be used to isolate areas in the filesystem and prevent changes in container mounts from propagating into the host systems mounts.
IPC - Inter-Process Communication Namespaces
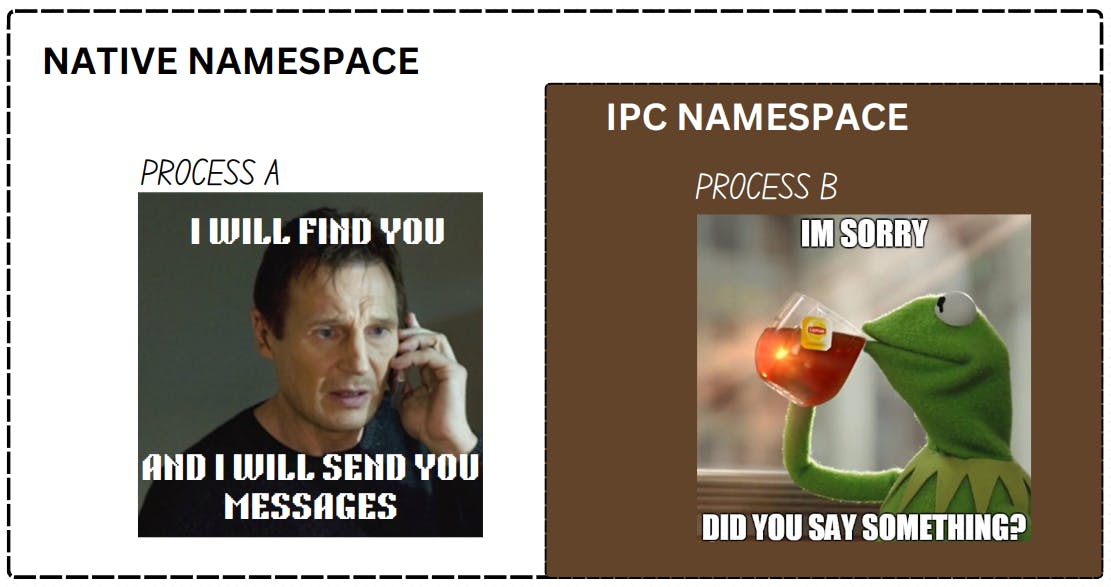
This namespace is used to isolate processes' access to shared memory. Normally all processes in the native namespace read and write to a single block of the RAM. But with this namespace, you can sever the ability of processes to share memory indiscriminately. As a result of this, processes in this namespace cannot talk to processes outside it by sharing data in memory. This can help prevent attacks based on shared memory that could potentially cause the host to crash. These namespaces will help you isolate those types of attacks limiting their area of influence.
To create an IPC namespace, run the unshare command with sudo privileges and the -i flag
sudo unshare -i
PID (Process ID) Namespaces
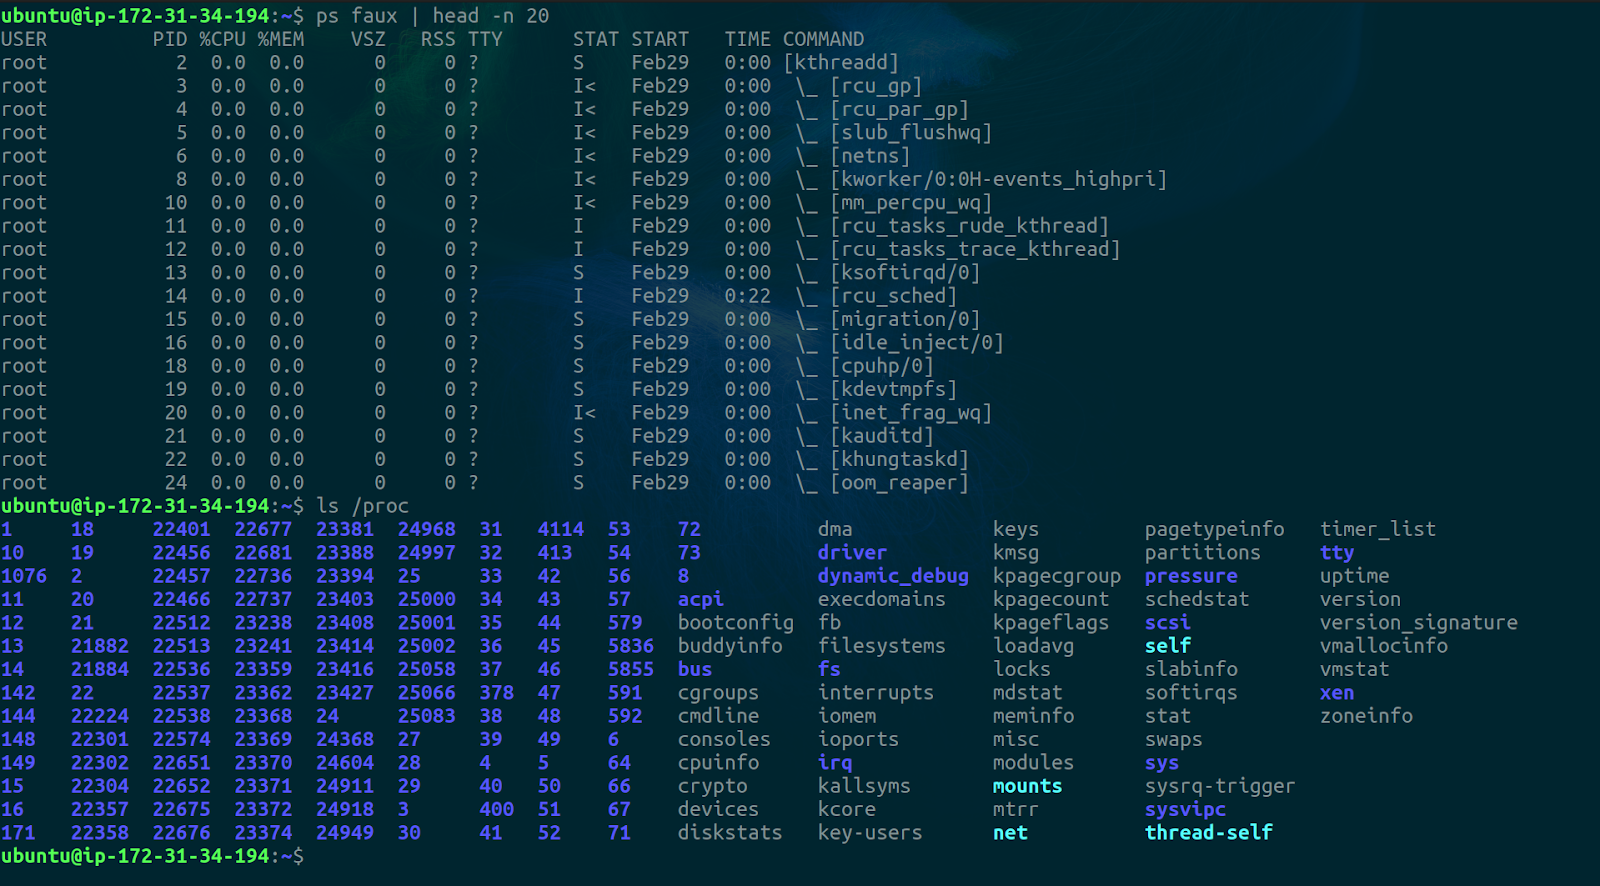
This namespace allows us to isolate process trees and effect a view of them as though they were the only processes running in the system. For example, if you run a docker container and inspect the running processes in the container you’ll find something like this,
docker run --rm -it --name box busybox
ps faux
ls -la /proc
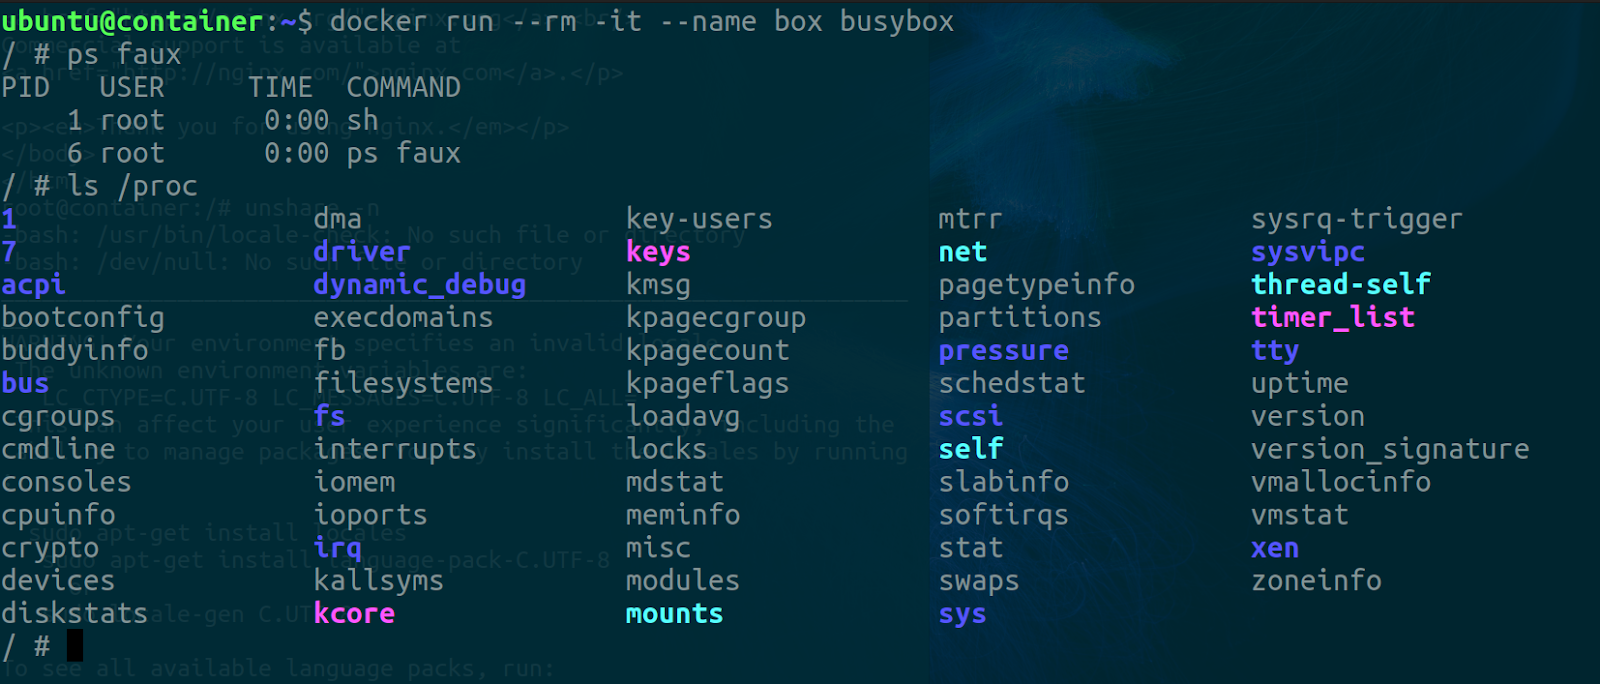
You’ll notice that the ps command returns only 2 processes but more than two processes are running on the host. The first one is the current shell that keeps the container alive. You can think of it as the init.d of the container. The results from inspecting /proc also show two pids but this time it's the shell and the ls command.
If we try running the same commands outside the container in a different terminal session we’ll see a different result. Only the first 20 lines of ps are printed because the output is a lot.
This shows the power of the PID namespace. It allows us to isolate process trees from the main process tree view.
Let’s mimic this, shall we?
First of all, we have to create a new mount and pid namespace. Then we’ll inspect /proc and the ps command. We’ll then mount a new proc mount to /proc and inspect /proc and ps again.
sudo unshare -mpf
ps faux
ls -la /proc
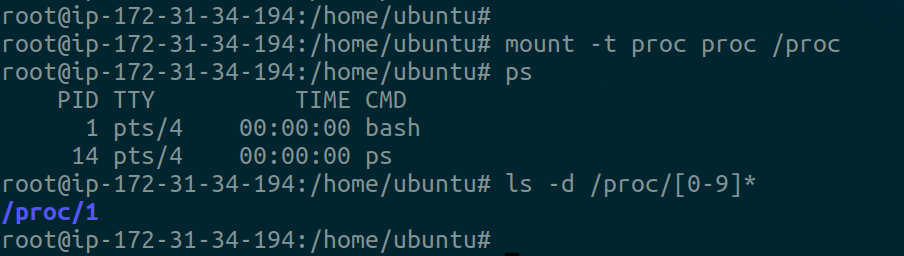
mount -t proc proc /proc
ps faux
ls -la /proc
The unshare command with the -p flag creates a pid namespace while -f tells the kernel to fork the process (it’s usually used in conjunction with PID namespaces). The first two commands return something like this
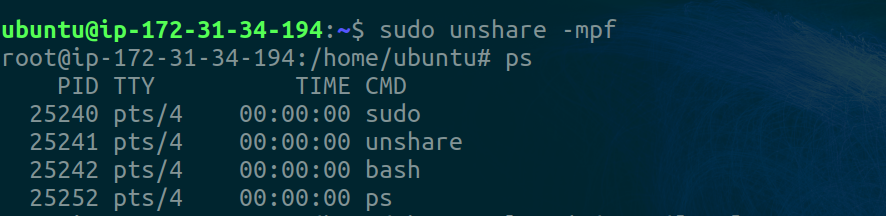
You’ll notice how the PID values are really high. This doesn’t show the isolation we were promised. Why is that? Well, this is because the current PID namespace inherits the previous namespace process IDs stored in /proc. Inspecting /proc in the native namespace and in our namespace makes this clear.
To correct this behavior we need to mount a new proc pseudo filesystem to /proc. Once that is done, the last two commands return the expected results. If you inspect the native namespace, you’ll find that it’s still the same as before unaffected by the changes in our created namespace.
Time Namespace
According to the manpages,
“The processes in a time namespace share per-name‐space values for these clocks (monotonic and bootime clocks). This affects various APIs that measure against these clocks, including clock_get‐ time(2), clock_nanosleep(2), nanosleep(2), timer_set‐ time(2), timerfd_settime(2), and /proc/uptime.”
To create one, run the unshare command with the -t flag
unshare -t
User Namespace
These namespaces allow you to isolate various identity information such as user ID and group ID. It can allow you to map users from the parent namespace to users in the child namespace. Why would you want to do this? Well, If you’ve been paying close attention, anytime we enter a new namespace, we’ve had to use sudo and we become root in that namespace. Now this wouldn’t be so much of a problem if not for the fact that we also gain root privileges to affect the host.
Let’s see this in action. We’ll create a mount namespace, create a file, and inspect the owner.
sudo unshare -m
touch new-file
ls -la new-file
exit # exit namespace or open VM in another terminal
ls -la new-file
The results should be something like this

On the left, I have created the mount namespace and a new file. Inspecting the file details in the mount namespace shows it belongs to root as expected. On the right, I’m in the native namespace, and inspecting the file shows it belongs to root. This is because the namespace was created using sudo.
The user namespace adopts a hierarchical structure where the newly created namespaces inherit from the calling user namespace (parent). This allows the isolation and inheritance of capabilities (granular superuser privileges).
This helps to prevent this type of behavior where a root user in a namespace created by a non-root user is allowed root privileges even outside the scope of their namespace. It does this by allowing the mapping of users from the parent namespace to the child namespace. This way the kernel can track who exactly is making calls and which capabilities they have.
To do this you need to call unshare with the -U and -r flags. The -U flag tells unshare to create the user namespace and -r maps the current user to the root user in the new user namespace.
Let’s repeat the previous exercise but this time create a user namespace along the way. Make sure to not include sudo also as you’ll run into privilege errors.
unshare -mUr
touch new-file
ls -la new-file
exit # exit namespace or open VM in another terminal
ls -la new-file

As we can see in the right terminal, the new-file created is no longer owned by the root. We have successfully granted a regular user the ability to perform root operations scoped to a particular namespace which reflects on the parent namespace as the calling user and not root.
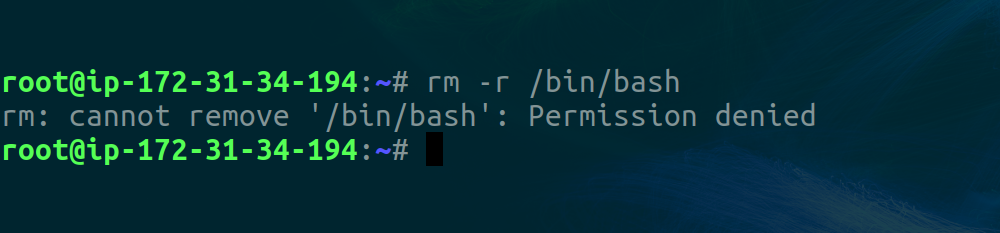
This is an important security feature as it allows changes to be made in containers with worries of affecting the host with root privileges. For example, you can’t delete bash (the default shell) or the root directory from a user namespace.
FUN FACT: If you don’t pass the
rflag while creating the user namespace, you becomenobodya system user automatically created by most UNIX-based OSes with the least privileges.
UTS (User Time Sharing) Namespace
This namespace helps us to define specific hostnames for containers so they don’t share the same hostname as the host system. To create a new one, you use the -u flag with the unshare command.
sudo unshare -u
After this, you can change the hostname
hostname <new-hostname>
If you inspect the native namespace and the new namespace using the hostname command, you’ll find that they are now different.
hostname
Network Namespaces
An example of usage can be seen in the way Docker handles its networking. You can provision multiple containers and all of them can run a webserver with a socket that listens on port 80 of each container. This is only possible because of the isolation provided by the network namespace. It allows us to provide isolation for network objects such as socket ports, DNS configurations, routing tables, firewalls, and so on. With this, you can define multiple network namespaces with each having a port 80 that can run a web server accepting HTTP requests.
Let’s see how we can use this!
sudo apt install nginx -y
curl localhost
unshare -n
curl localhost
In this example, we install a web server and verify that it’s working using the curl command. Then we create a new network namespace by passing the -n flag to unshare and we check again. This time you should notice that the connection on port 80 fails. This is because we are currently referring to a different port 80, one scoped to the network namespace we just created and no listener socket is attached to it. If you exit the namespace and curl again, you’ll find that NGINX is still serving content to port 80 in the native/parent namespace.

CGROUP Namespace
Control groups. This is an interface exposed by the Linux kernel to restrict the access of processes to system resources. It allows us to limit the number of processes that can be run at once, limit the CPU and memory usage of processes as well as limit the IO operations of processes.
They are exposed via the Linux file API as a pseudo filesystem regulated by the kernel. It adopts a hierarchical structure meaning that you can nest cgroups within each other. To make use of this feature you’d typically make use of systemd APIs or access it directly by making changes to the /sys/fs/cgroups sub-directory. The cgroup hierarchy is enforced via this file tree as child cgroups are placed as subdirectories of parent groups.
For obvious reasons, this feature requires special privileges to execute and is enabled by the CAP_SYS_ADMIN capability.
This feature is used extensively in virtualization technologies where things like multi-tenancy, resource consumption limitations, and accounting are required.
Let’s look at a simple example to make this more concrete. We’ll create a new cgroup and restrict the number of processes that be run inside it to a number of our choosing.
First, navigate to /sys/fs/cgroup. Inspecting this directory shows that it’s owned by root so regular users won’t be able to make changes to it.

So we have to use sudo or switch to root.
To create a new cgroup, we just need to make a new directory in /sys/fs/cgroup. Immediately after this inspect the directory.
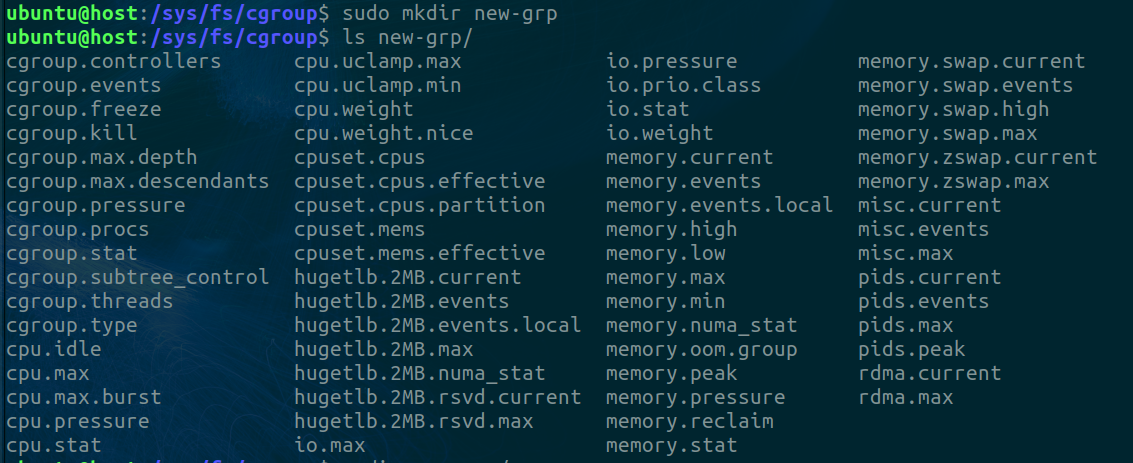
Wait that’s not right. That’s not how directories work. It’s populated and we didn’t do that. Remember when I said this path is a pseudo filesystem? That is because it’s managed by the kernel. The kernel created all these files and directories because it recognized that you just attempted to create a new cgroup.
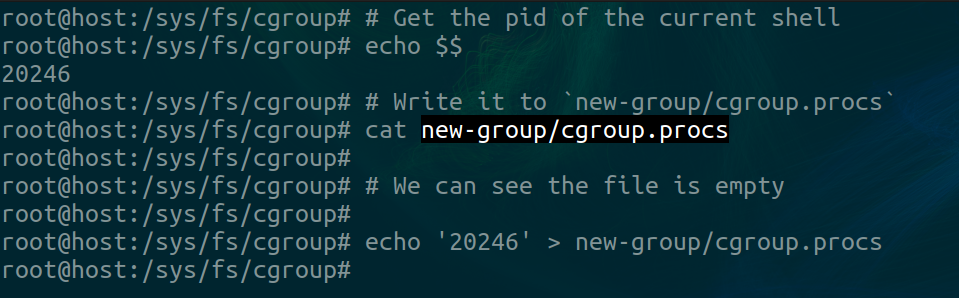
Now we’re going to change the number of processes that can be run in this cgroup. To do that we write an integer as a string to new-grp/cgroup.pids.

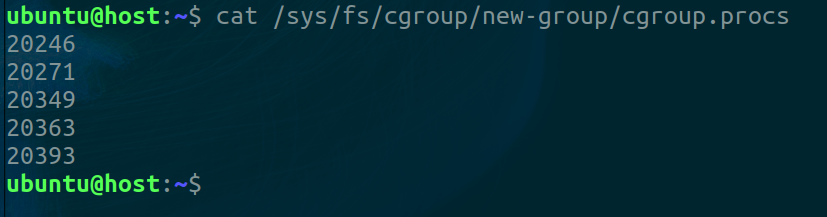
Now let’s test this out. We’ll move our current shell into this new cgroup.
If we open another shell and inspect how many processes are running, we get this
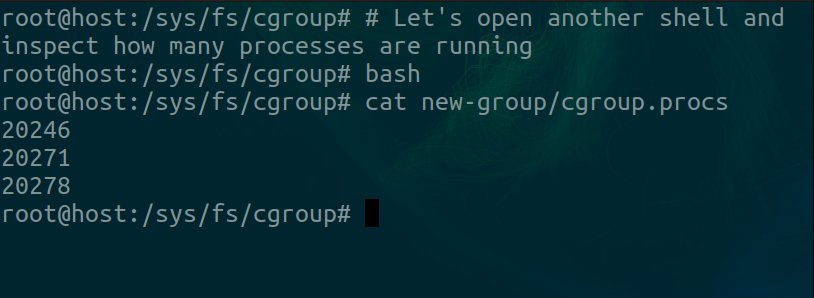
Three entries. The first is our original shell, the next is the current shell and the last one is the cat command.
Let’s check if we can get it above 5.
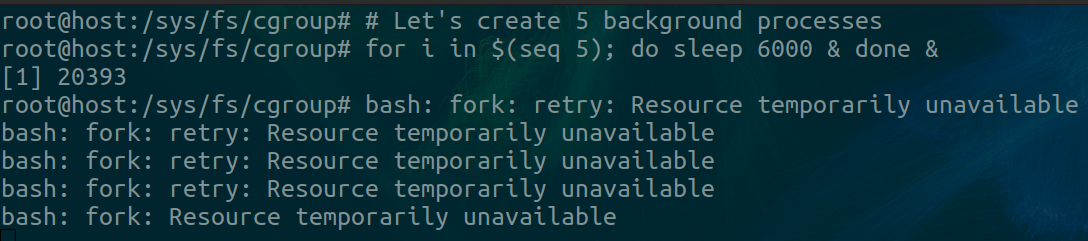
We run a for loop over a range of 5 and run a sleep process in the background on each iteration. As soon as we hit the max of 5, the request to bash to fork another sleep process fails. Bash retries a couple of times before giving up.
While this is happening, in a different terminal we can indeed verify that our max process number has been reached and is not exceeded. The above picture shows this.
Putting Everything Together
For this demo, we’ll be creating our own custom container. From scratch of course! I will be using a custom filesystem (spoiler alert: it’s an Ubuntu docker image). I’m doing this because we will be running a webserver inside of it whose installation I want to isolate too. We will be applying chroot and other namespaces too. Let’s go!
Step 1 - Get a suitable filesystem.
For convenience, we’ll just use a docker image for this. Pull the docker ubuntu image
docker pull ubuntu
This image doesn’t have a webserver so we’ll install one later.
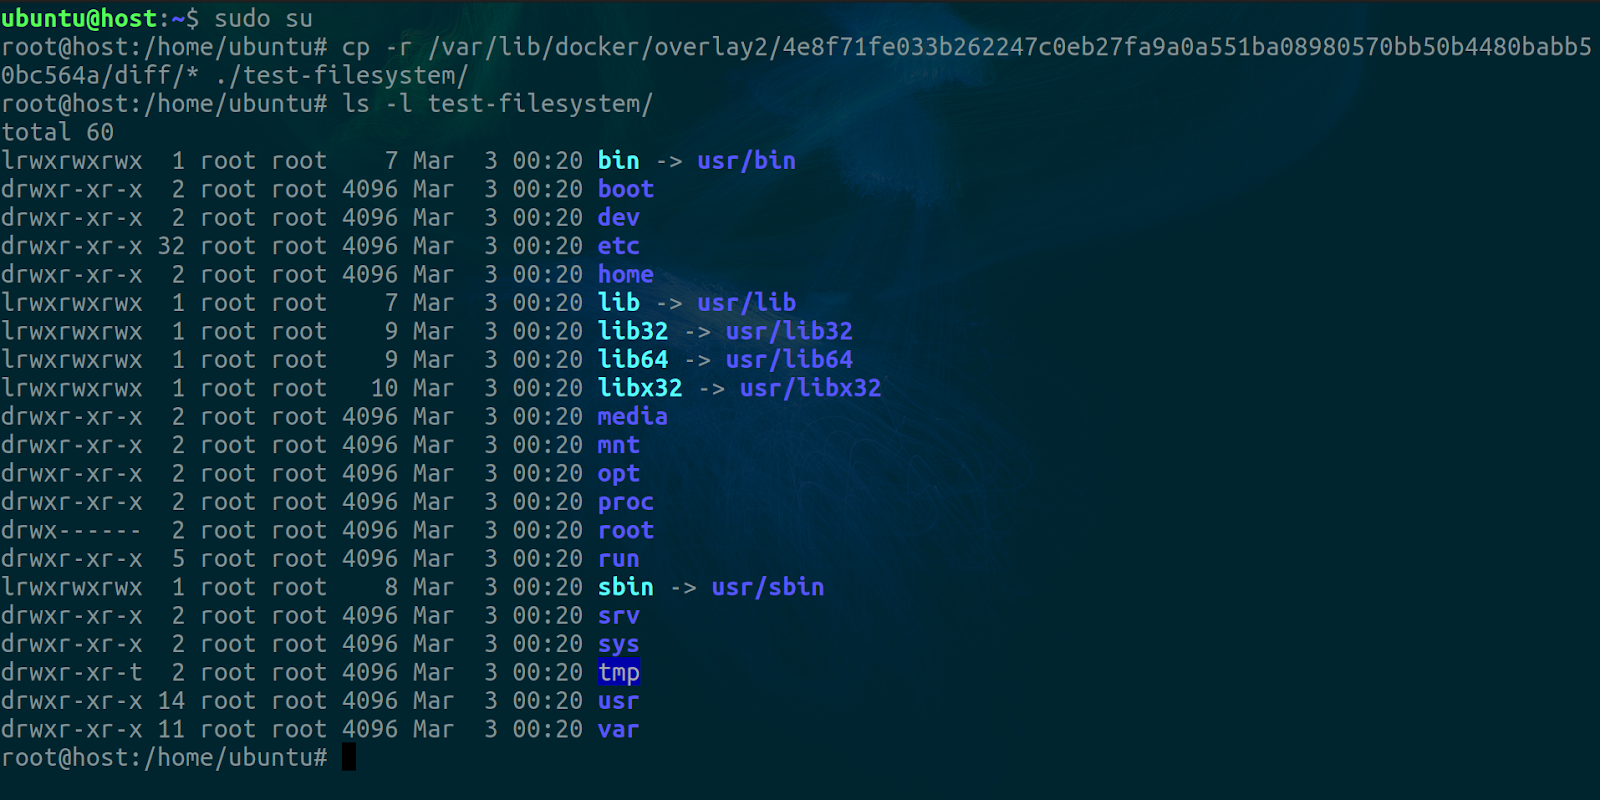
Step 2 - Locate the image in your filesystem and make a copy
This will be easier if you have just one docker image on your VM. After pulling, docker stores the filesystem in the image in the /var/lib/docker/overlay2 directory. You’ll see a hexadecimal hash in this directory. If you have only one image present, you’ll have only one of these directories. Inside it, you’ll see a diff directory. That’s what we’re interested in. You can copy it to wherever. It will become our chroot directory in a bit.
Here’s what it looked like on my end
Step 3 - Create relevant namespaces and chroot into our copied filesystem
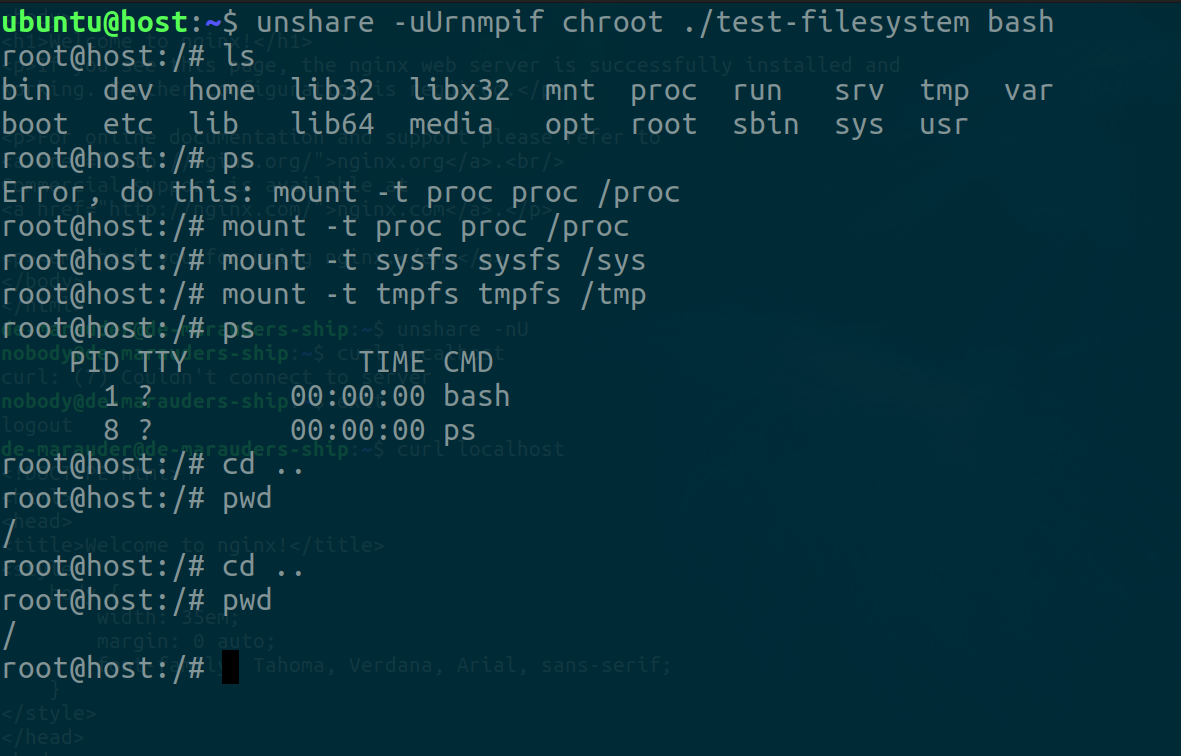
unshare -uUrmnpif chroot <path-to-copied-filesystem> bash
This will create all the namespaces we have discussed except that of cgroups and time. We pass the chroot command to unshare as the caller process for our namespaces and indicate that chroot should look for bash in the filesystem. It should be present since this is an Ubuntu filesystem. If it’s not you can try sh.
Step 4 - Mount relevant directories
In this step, we need to recall the behavior of the PID namespace from earlier. As such, we have to mount a couple of paths. We'll be needing a new /proc to isolate the container's view of its processes. We'll also be needing a new /sys and /tmp pseudo filesystem so the container only sees only its own and does not write to that of the host
mount -t proc proc /proc
mount -t sysfs sysfs /sys
mount -t tmpfs tmpfs /tmp
These new mounts help us secure these mount points and prevent changes to them from affecting the native/parent namespace.
There you have it folks! Our very own container!
In Conclusion,
What is a Linux Container?
Chroot on steroids
…. Some dude

As has been shown in this article, a Linux container is simply an isolated process facilitated by Linux primitives like chroot, namespaces, and cgroups. We tried to mimic some minimal functionalities of a container using these primitives and were pretty successful. The operations that we performed in this article would typically be managed and orchestrated by a container runtime.
It’s important to note however that our example is not a full-fledged container as there are still some considerations regarding networking, security, and resource management we didn’t talk about in this article. So we’re not about to replace docker just yet.
Understanding the inner workings of our tools as Software Engineers, DevOps Engineers, and System Administrators is very important. This makes certain problems easier to think about by eliminating the curse of black boxes.
If you got here, I hope you learned something from this. If you’d like to learn more about these topics please reference the following materials