Getting started with Git and GitHub: How to create a new GitHub repository

Software Engineer || Part-time Otaku
I like finding simple ways to explain complicated concepts
Introduction
Let's talk git. If you are a software developer or find yourself with the need to manage a project in such a way that multiple people can work independently on features and contribute to the same project then you'll be needing a version control system, one of the popular ones being git.
A version control system typically ensures the integrity of a project by taking a snapshot of its state at different intervals of development or production. This allows the developers to revert to the previous snapshot if the current system is faulty or no longer favourable.
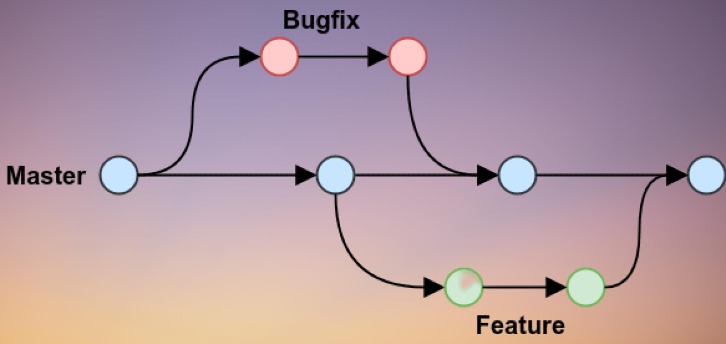
Git operates by defining a main (master) branch that tracks the different stages of development in a project. This main branch typically stores information about the production-ready project.
Git also allows multiple developers to collaborate by allowing them to branch off from the main branch, perform changes and integrate them back into the main branch if so desired.
Developers can also contribute to other developers' work (open source) by opening pull requests which essentially copy a project or branch of a project with the purpose of adding, removing, upgrading or fixing features. These changes are then reviewed by the project owner and then integrated into the main project if found satisfactory.
As a beginner using git, there are certain commands and tips which you should know and I'll be sharing them in this article.
How to create a GitHub account
To properly utilize git to its fullest extent you will need to create a GitHub account so that you can store changes to your projects on a remote server.
A remote server is just a fancy name for a dedicated computer somewhere in the world that is almost always guaranteed to have your data ready for you. This is often referred to as "cloud storage".
Other platforms provide similar services to GitHub. Some of them include GitLab, bitbucket, gitea and source forge. However, GitHub is the most popular and so will be the subject of this article.
To create a GitHub account, hop on any browser of your choice and visit https://github.com, click the signup button and follow the prompts.
Congratulations! You now own a GitHub account.
How to create a repository on GitHub
Once you've created a GitHub account you'll want to create a repo or repository. Think of it as a bin for storing your project.
To create a new repo, follow these steps:
Locate the green button on the left sidebar that says "create repository" and click on it or you could locate and click on the + icon next to your profile image at the top right of your system. A drop-down will appear. Click on the option for “new repository”.
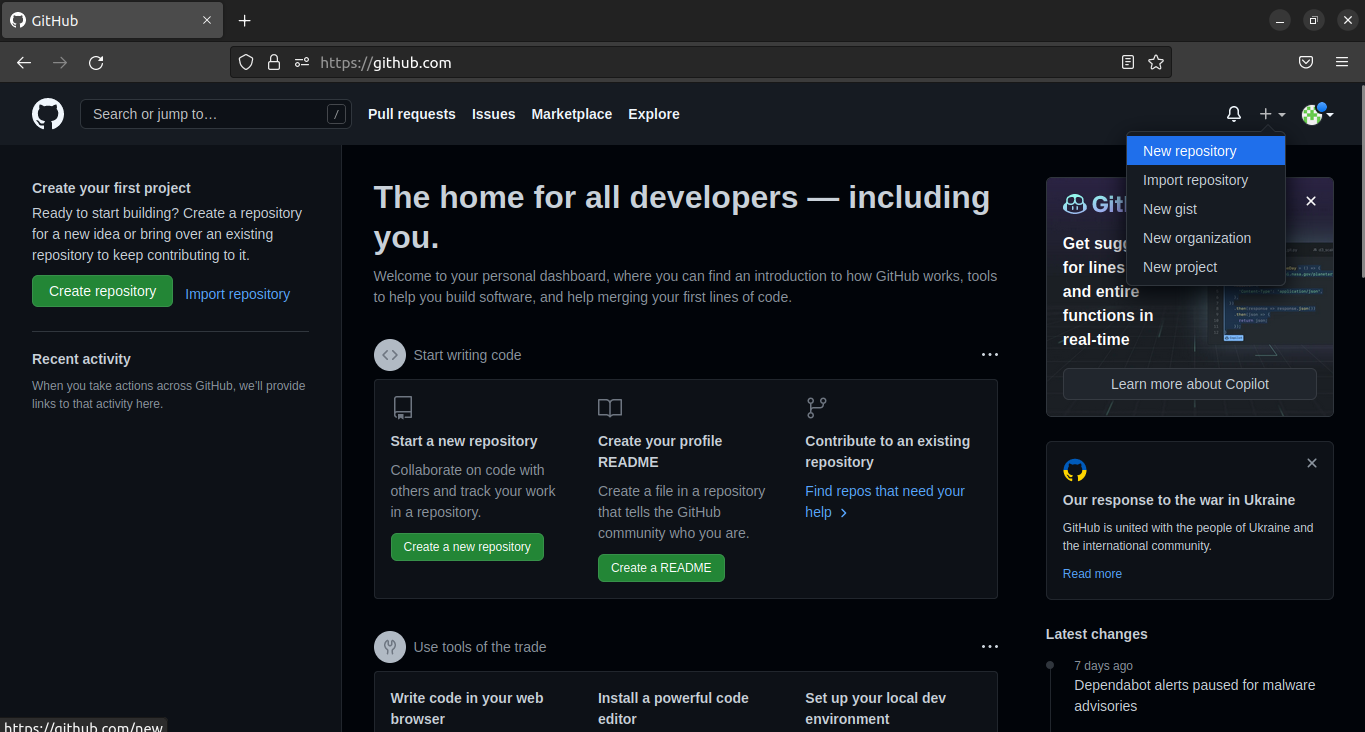
At this point GitHub will ask you the name you would like to give your repository as well as a brief description of the repository. Only the former is required, the latter is optional. Both of them however can be updated at any time in the future.
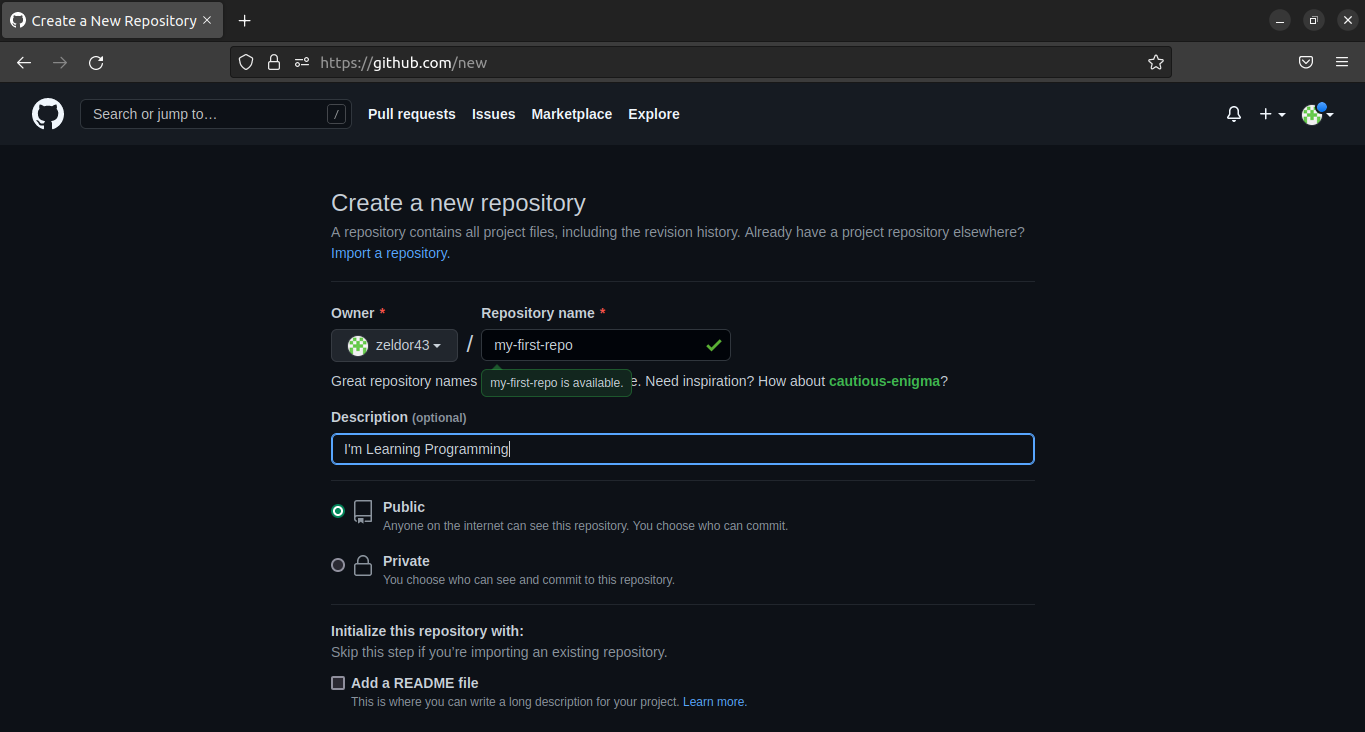
Next you'll select whether you'd like to keep your repo public or private. A private repo cannot be read or written to without your express authorisation while a public repo can be read by anyone but can't be written to without your authorization. As a beginner, it's safe to initialize your repo as a public one.
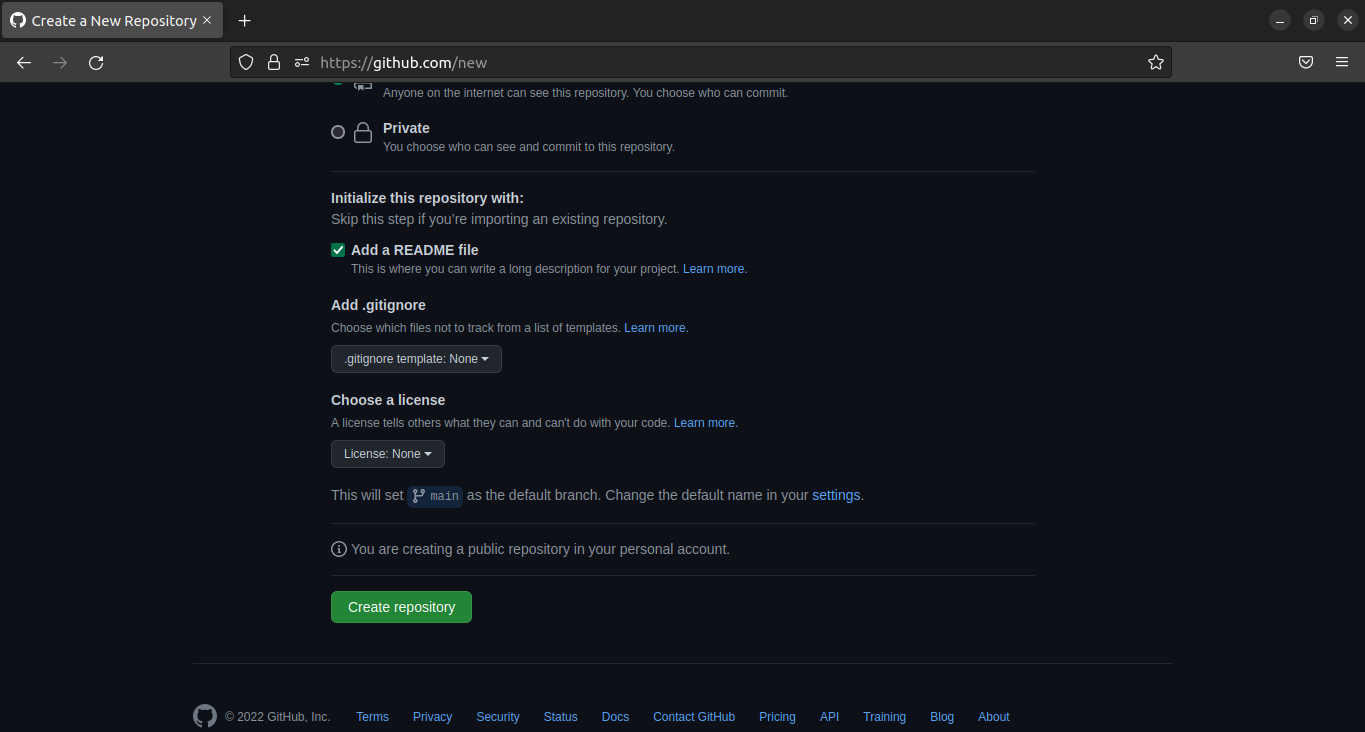
You'll also be asked if you would like to include a
README.mdfile. This is a file written in markdown, a markup language for formatting plain text. It typically contains a detailed description of the repo including but not limited to:- The name of the project
- The purpose of the project
- Instructions to use it
- Dependencies
- An invitation for collaboration
You can however elect to not include this file just yet.
- The name of the project
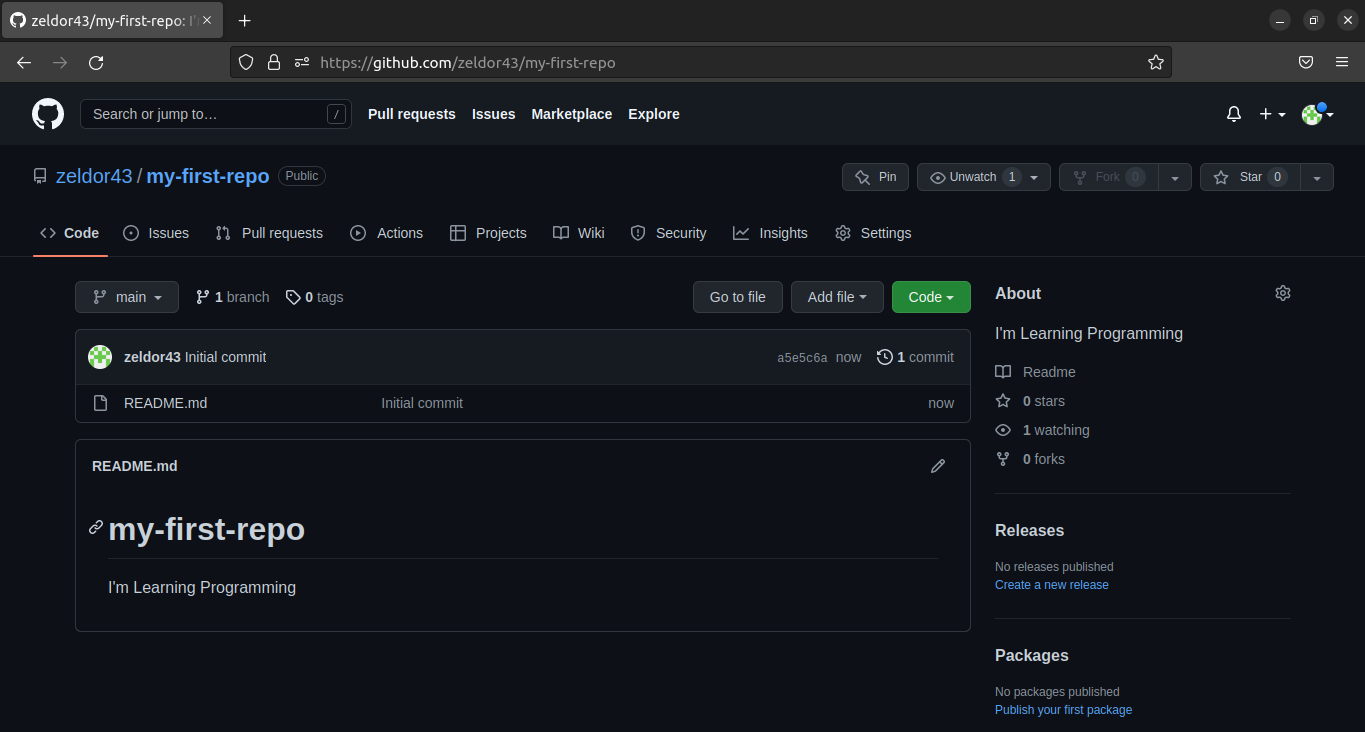
Once you've made all the above selections you can then click the green button to create your repo. If you chose to create the repo with a readme file then your repo will be automatically initialized on GitHub and you’ll be redirected to a page like the one below. You can then proceed to clone the repository to your local device. More on this is below.
Else, you will be redirected to a page with instructions on how to initialize your project and push (send your project) to your repo. It’ll look like this:
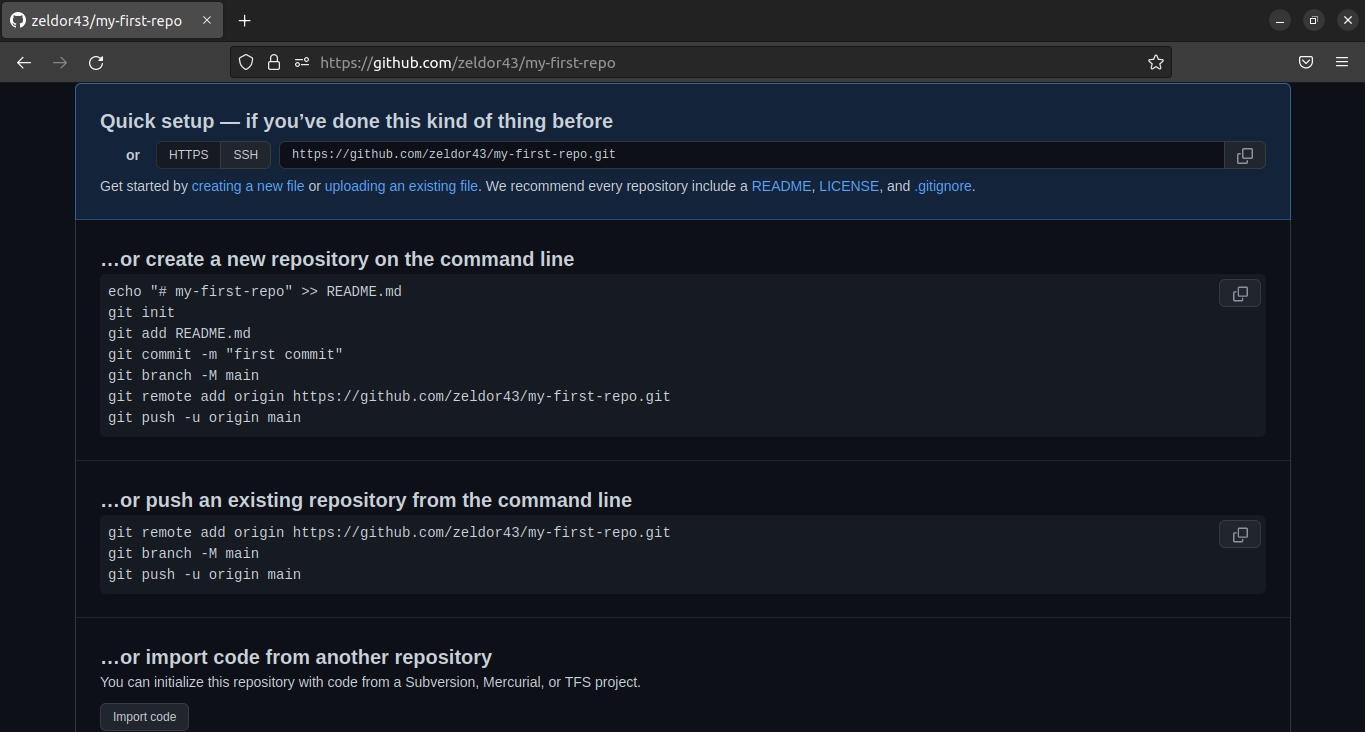
At this point, you have 3 options:
- Clone the repository to your local device and start your project
- Initialize git manually in your empty project folder
- Initialize git manually in your already existing project
All three steps are quite easy to follow and you only have to select one.
Clone your repository to your local machine:
Open a terminal or command line interface on your system and navigate to the directory you'd like to create your project in and then run these two commands:
git init
git clone <repo_url>
Where <repo_url> will be substituted for your repository URL. You can obtain this URL from your repo when you create without a readme. It’s just at the top of the page above the two big code blocks.
If you initialized your repo with a readme then you’ll find the <repo_url> if you click the green button that says “code”.
It's important to note that these commands require that you have git installed on your system and added to your PATH as an environment variable. So if you haven’t installed git already click here to download the appropriate version for your operating system.
The command git init initializes a git repo in your current working directory. After running it, a folder called .git will be created to store all your git information. This singular folder manages all your local git operations and is where your data is stored when you stage files and make commits.
The command git clone <repo_url> instructs git to look for a git repository at the URL marked with <repo_url> and essentially copy all its contents to your local machine in your current working directory.
After running these two commands successfully, your project will officially be initialized on your local machine and synced with your remote on GitHub.
Congratulations, you can now begin to create magic!
Initialize git manually in your empty project folder
For this process, you’ll have to make use of the code in the first block labelled (...or create a new repository on the command line).
echo "# my-first-repo" >> README.md:
This command creates a new fileREADME.mdin your current working directory (cwd) and writes the string “# my-first-repo” into it.git init:
As has already been explained this initializes git in your CWD.git add README.md:
This command stages the fileREADME.md. It tells git, “Hey, notice me and keep track of me”.git commit -m "first commit":
This tells git to take a snapshot of the current state of the files being tracked which for now consists only ofREADME.mdbut will later include all files you add usinggit addgit branch -M main:
Thegit branchcommand creates a new branch named "main" while the-Moption tweaks the command to rename the previous branch created by default to this new branch. So if branch "master" was created initially. Running this command will change the name "master" to "main"git remote add origin <repo_url>:
This command adds the repo at<repo_url>as a remote named "origin" which you can then push to by referencing the name "origin".git push -u origin main:
This command pushes all committed changes to the "main" branch of the remote named "origin". The-uoption setsorigin mainas the default location (upstream) to push to.
Initialize git manually in your already existing project folder
It might be the case that you’ve been working on your beautiful project for a while and just now decided to push it to GitHub. If this sounds like your current situation, here’s what you need to do:
git remote add origin <repo_url>
git branch -M main
git push -u origin main
The functions of the above commands have already been explained above.
Make sure to initialize git, add (stage) your files to be tracked by git and commit your changes if you haven't before running the above commands.
With this, you have successfully initialized your project with git, made your first commit and pushed it to GitHub.
Conclusion
In this article, we went over the following:
- How to create a new repository on GitHub.
- How to clone a new repository from GitHub on your local machine.
- How to initialize your projects with git.
- How to make commits.
- How to push changes to Github.
Please leave a like if you found value in this article and share to help others. If you have any issues following the instructions in the article or disagree with anything in it, kindly let me know in the comments section.
Till next time friends.