

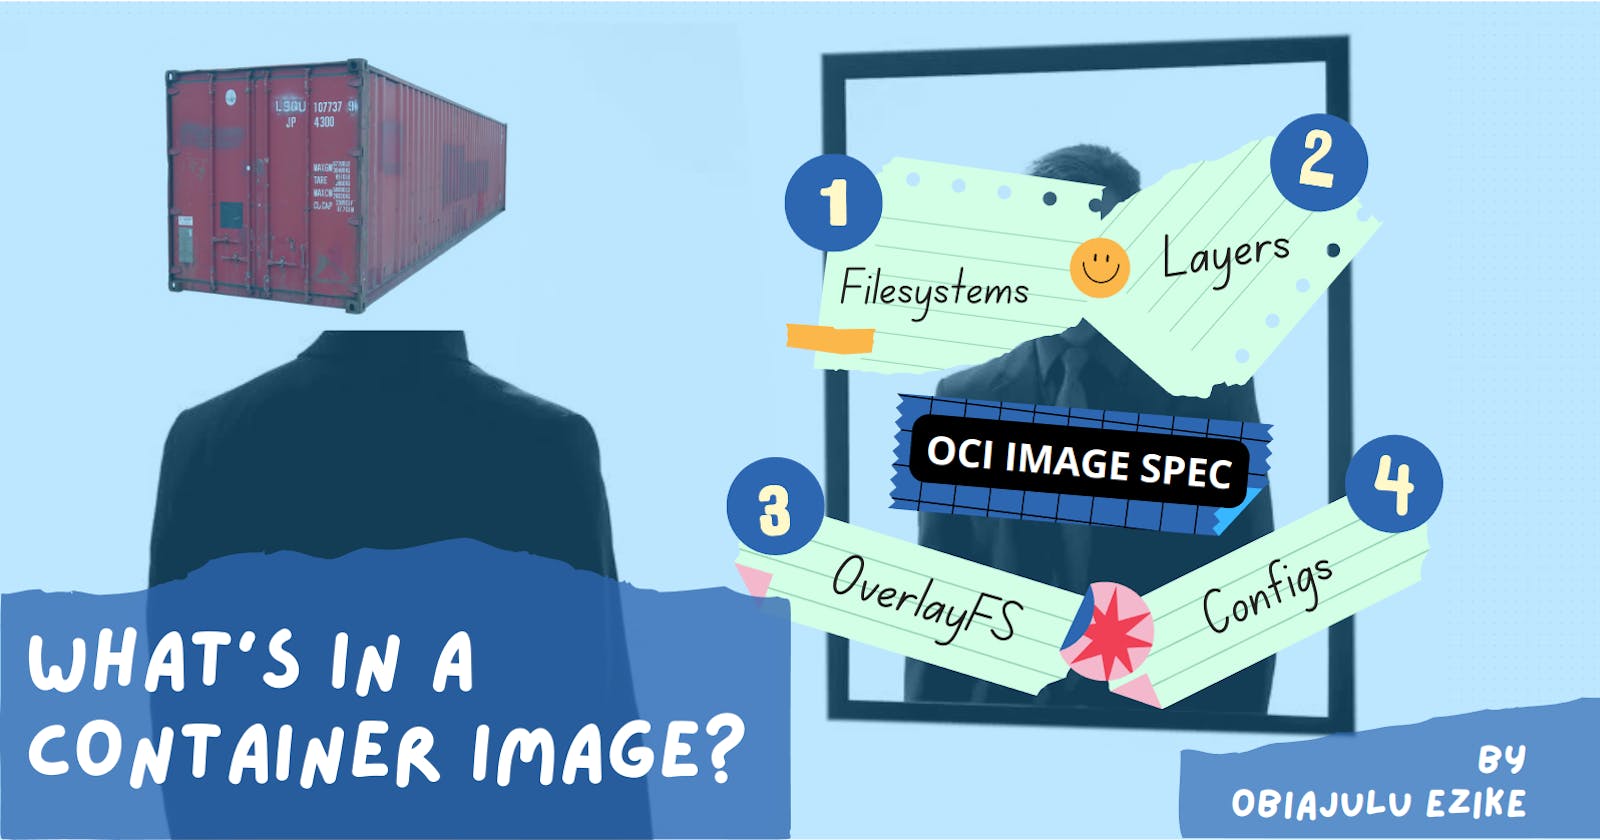
What’s in a Container Image
Containers the hard way - Images, Layers, and Filesystems


In a previous article, I wrote about how a container works and how we could go about creating one. It was shown that the container environment required specific files or better yet, a filesystem to function properly. Container images are an attempt to encapsulate the requirements for a container environment into an easily transferable format to facilitate software packaging and sharing.
In this article, we’ll be taking a deep dive into the wavy waters of container images to see just how we can get our desired filesystem out of it.
Pre-requisites
To follow along smoothly I recommend you have
Basic knowledge of Linux commands
Knowledge about containers (check out my previous article if not)
A Virtual Machine to run the commands if you’ll be following along (I recommend you follow along).
Now, Let us begin!

Introduction
If you’ve been using containers for a while you’ve probably heard of docker. This is the most popular tool for interacting with containers and images. So much so that most terminologies in the container space reference it, for example, you’ll commonly hear people call containers “docker containers” or container images “docker images”. The list goes on. In this article, we will be exploring other tools to interact with containers and images because there is more to life than docker.
Yeah, I said what I said.
A container image provides a way to encapsulate a container environment so that it is easily shareable. It contains all the information about what a container should look like at runtime. The main purpose of the image is to provide a filesystem for the container. This filesystem is the container environment.
To do this at scale efficiently, one must consider different optimization techniques to avoid excessive duplication of files. The Open Container Initiative (OCI) outlines the specifications for what standard container images should look like.
With containerization technologies taking center stage these days, having a standard for these images is crucial to facilitate portability and migration between different tools. We can’t have only docker being used for all things containers. It’s important that others can build on this technology too.
The OCI Image Spec
To answer this question we will use a tool called skopeo to get an existing container image from a repository and inspect it. Skopeo allows us to interact with container images and image registries (where the images are stored in the cloud) and perform actions like copying, deleting, and inspecting container images. It is lightweight and might be favored over docker if all you want to do is copy, delete, or inspect an image in a registry or host machine.
Let’s download skopeo.
sudo apt install skopeo -y
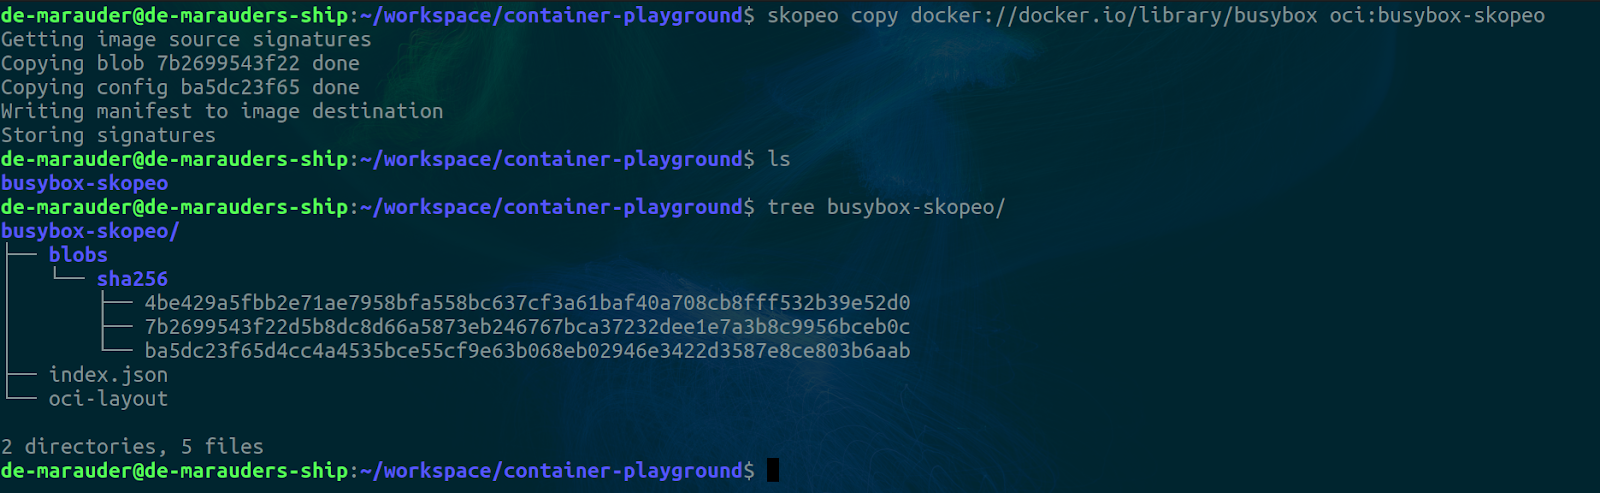
Now let’s get a container image from the docker hub repository
skopeo copy docker://docker.io/library/busybox oci:busybox-skopeo
If we inspect the current directory, we will see a new directory named busybox-skopeo. This command tells skopeo to copy the busybox container image from Dockerhub to our local environment in an OCI compliant format.
docker://docker-reference An image in a registry implementing the "Docker Registry HTTP API V2". By default, uses the authorization state in $XDG_RUNTIME_DIR/containers/auth.json, which is set using skopeo login.
oci:path:tag An image tag in a directory compliant with "Open Container Image Layout Specification" at path.
Let’s explore a bit further. Use your favorite text editor to open up the busybox-skopeo folder.
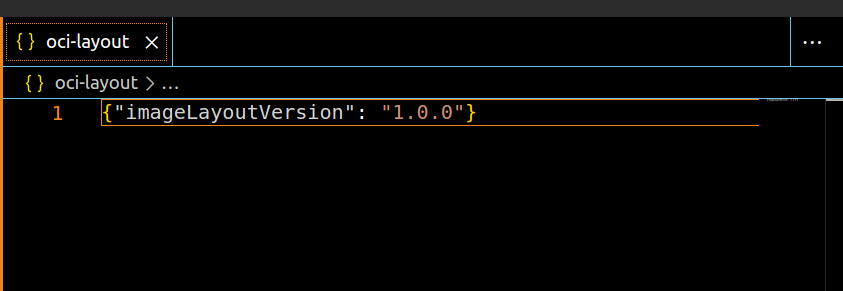
The oci-layout file contains information about the image layout version.
The next file to look at would be the index.json file
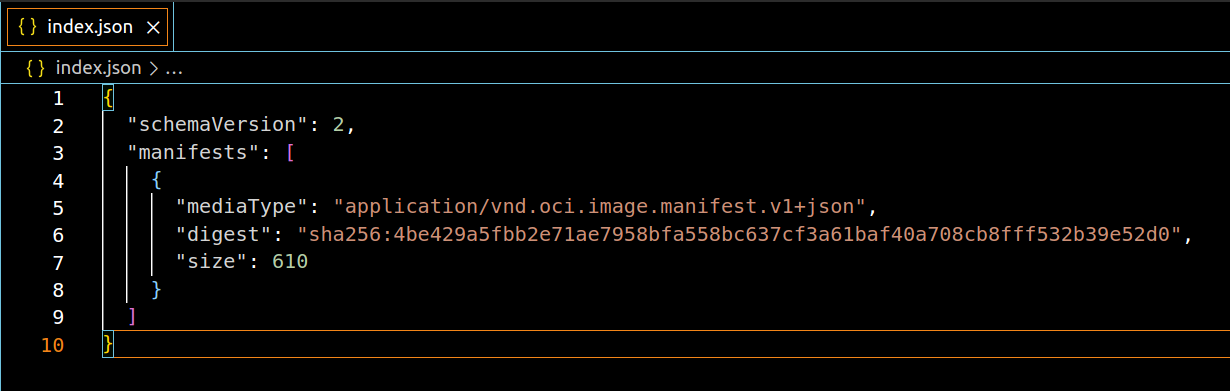
This is the entry point into the image. It contains information about the image manifests. In this case, we have only one manifest file and it is denoted using its SHA256 digest or checksum. We can also see the size of the file in bytes as well as the media type which in this case is json.
What is SHA256?
If you inspect the files in the blob/sha directory, you’ll find a file with a name matching the hash value.
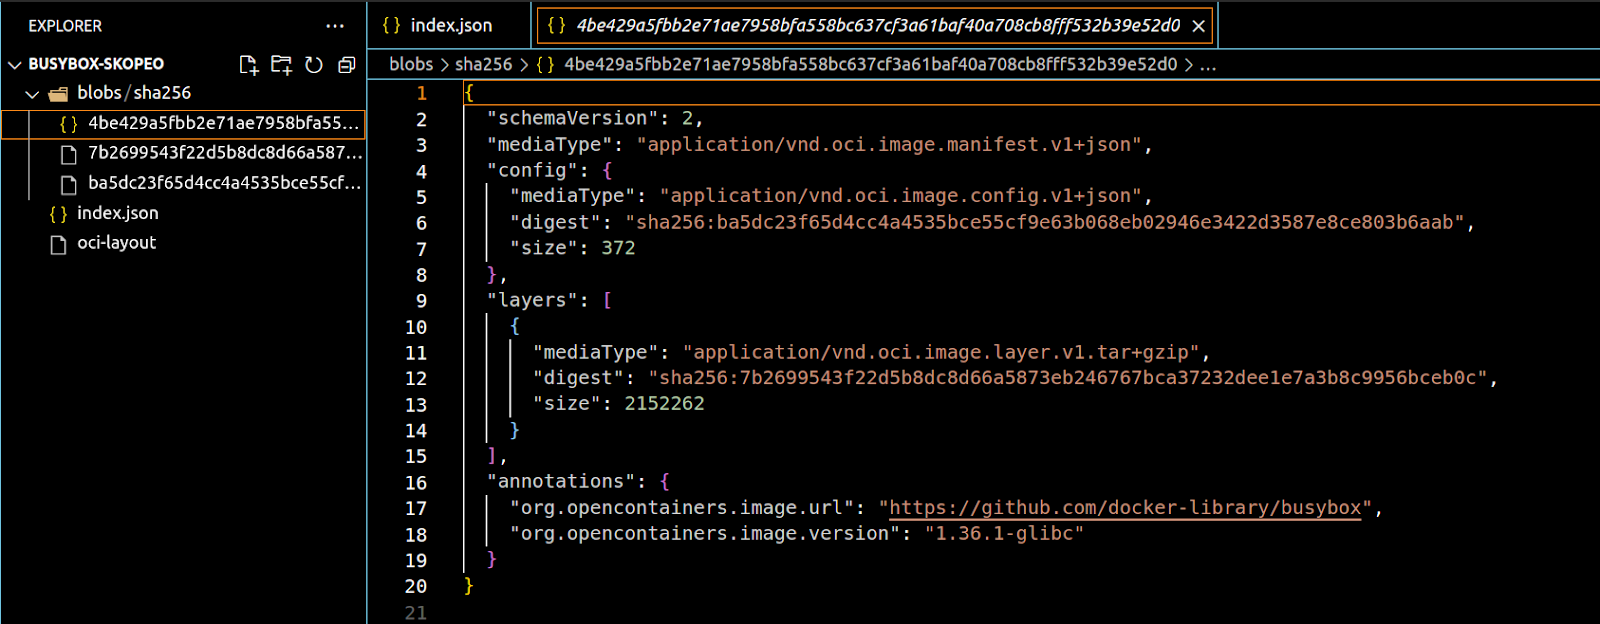
The image manifests provide details about the configuration information, the layers of the image, and the annotations. The annotations include extra metadata that can be used to identify an image like tags. This is how the tool knows how to interpret tags. The manifest corresponding to the annotation with the latest tag will be pulled if no tag information is supplied to the tool being used.
The configuration and layers are denoted as objects with a digest, mediaType, and size just like in the index.json file. If we follow the digests, we’ll find that they correspond to the other 2 files in this directory.
Let’s check out the config file.
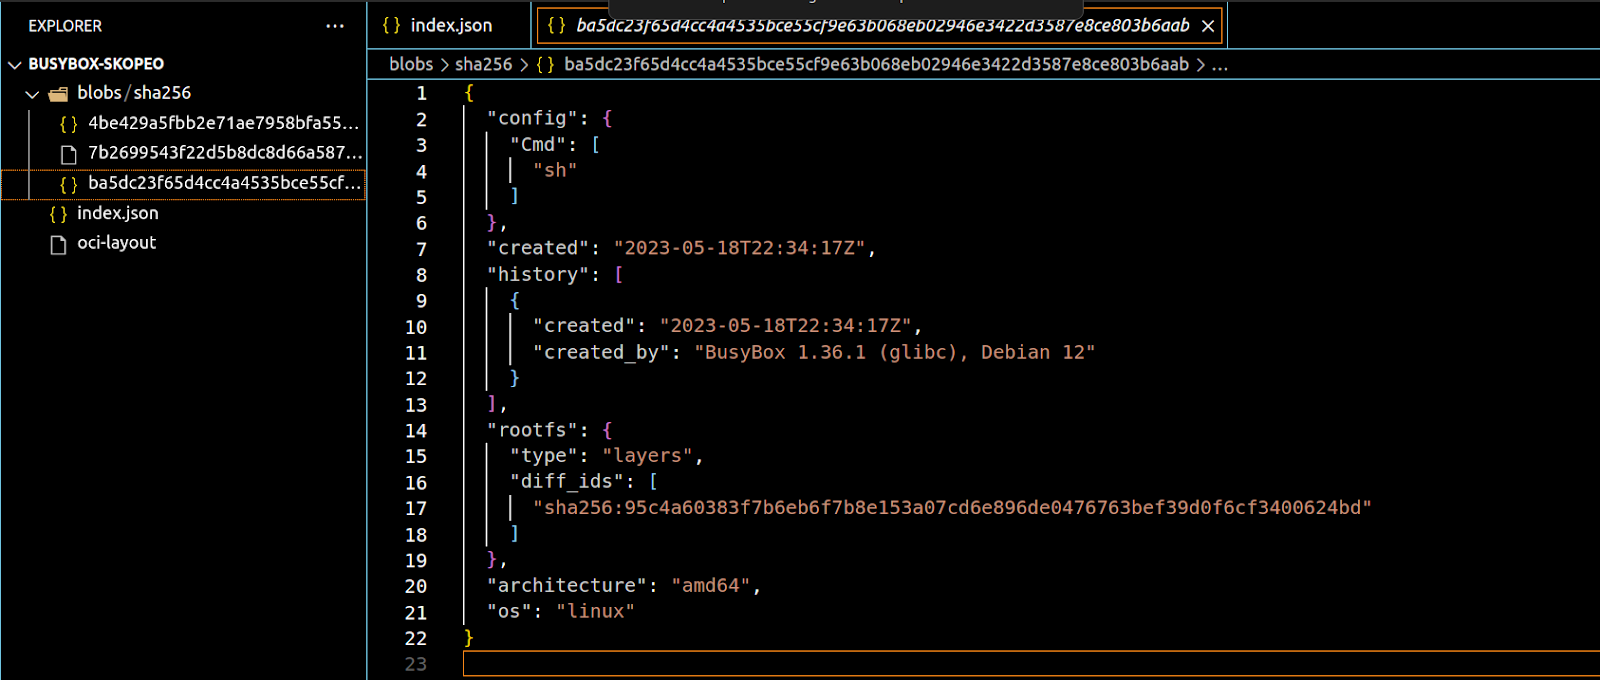
This file stores a history of all the actions taken to create this image. The things you would typically see in your Dockerfile or Containerfile (for the pedantic like me). It also contains the digest of the initial image layer (more on this later) in the rootfs section.
Finally, for this image, we have the layer. This file is a tar archive and needs to be unzipped before we can peek into it.
mkdir layer
tar -xf busybox-skopeo/blobs/sha256/7b2699543f22d5b8dc8d66a5873eb246767bca37232dee1e7a3b8c9956bceb0c -C layer
ls -l layer
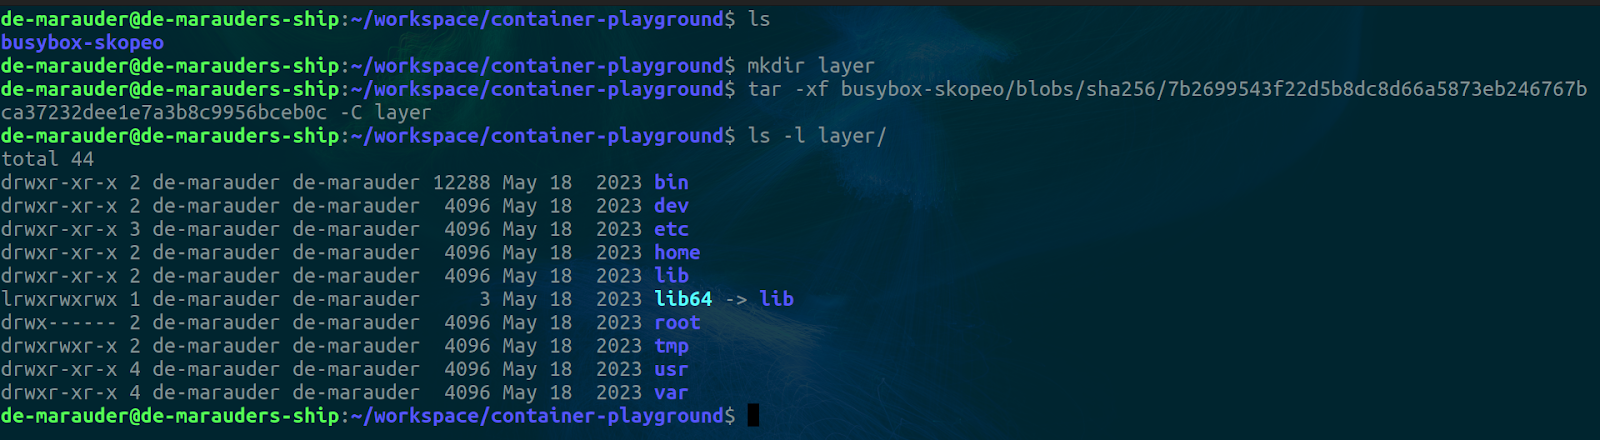
As you can see, this is our filesystem. Ready to be mounted or chrooted and used by a container.
The OCI image spec arranges the image this way to enable efficient retrieval by eliminating data duplication. It is much more efficient to pass references to files (the SHA256 digest) instead of passing copies of the files every time.
When an image processing tool wants to use this image to run a container, it first has to resolve the image tag to obtain the manifest files by making a request to the container registry. This request returns the digest of the index.json file which is used to download the actual file. It reads the information about the manifest matching our platform (host) architecture (in this case we have only one manifest so it just picks the one available) and pulls it using its digest. It then navigates through the configs and layers in the manifest making requests to the appropriate container registries when necessary to download the actual files when needed using their digest.
The image below shows a diagrammatic representation of what the flow looks like when you run docker pull to download an image. The requests are peculiar to the docker hub registry. You can use the docker save command as an analog of skopeo copy (you'll need to untar it though).

Containerization tools typically maintain a cache or storage on the host where they store the content of the digests to avoid having to make network calls when the files that match a digest are present on the host.
So we downloaded an already existing image using Skopeo. But surely we can build ours no?
How is a Container Image Created?
Container images are often prepared using a declarative method known as the Dockerfile or Containerfile. They can also be created from the command line manually.
Building Images Using a Containerfile
The Containerfile (aka Dockerfile...what did I say about Docker being everywhere again?) is a declarative way to build up the layers of a container image. It is used to define the state of an image.
But what do we mean by “layers of a container?” We’ve already hinted at this while looking into the OCI image spec.
Container images are built-in layers. Each line in a Containerfile specifies the state of a particular layer of the image. It represents an incremental change to the layer before it all the way down to the base image. The image layers are composed to form the container’s filesystem (more on this later) as well as provide some container configurations. This is done for efficiency.
As I said earlier, duplication of files is a problem when dealing with images as some of them can measure in gigabytes of data. This method allows us to cache built layers, mark them with their digest values, and share them across multiple containers. It also helps in the build process because if the digest of a layer does not change while editing the Containerfiles, they are reused. So you don't have to wait as long for a build.
Knowing this, Containerfiles are advised to be written in a way that optimizes utilizing the layer caching feature for faster builds.
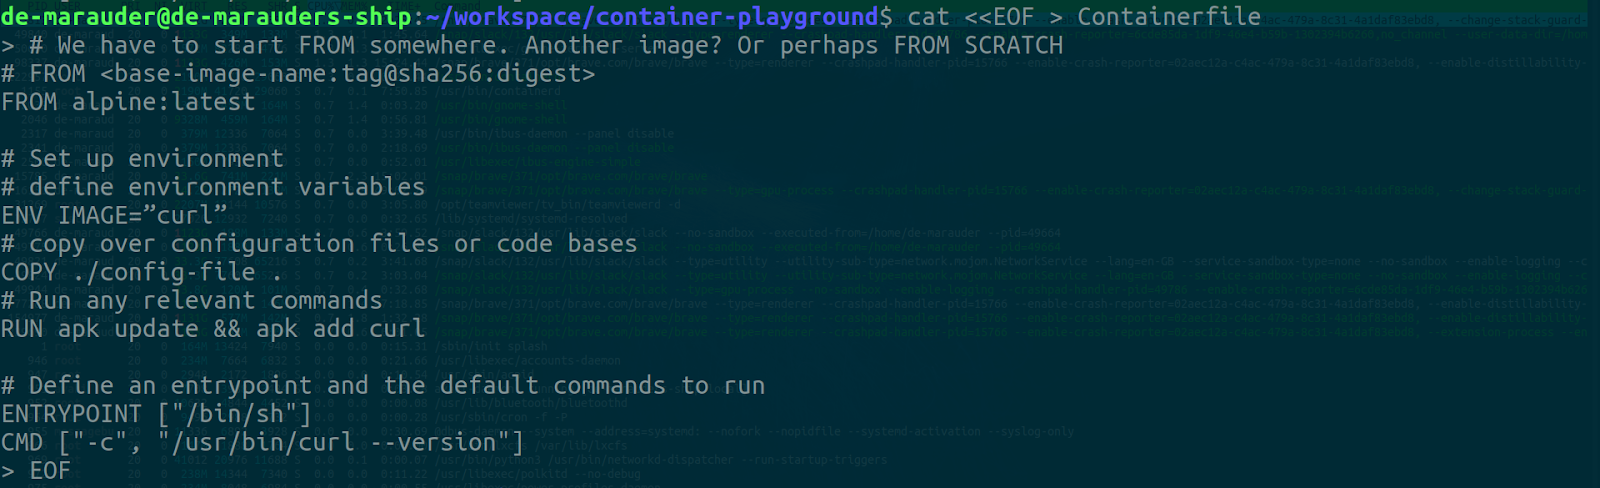
The typical anatomy of a Containerfile is as follows
# We have to start FROM somewhere. Another image? Or perhaps FROM SCRATCH
# FROM <base-image-name:tag@sha256:digest>
FROM alpine:latest

# Set up environment
# define environment variables
ENV IMAGE="curl"
# copy over configuration files or code bases
COPY ./config-file .
# Run any relevant commands
RUN apk update && apk add curl

# Define an entrypoint and the default commands to run
ENTRYPOINT ["/bin/sh"]
CMD ["-c", "/usr/bin/curl --version"]
This containerfile starts from the alpine image, sets an environment variable, copies over a file, installs curl, and defines sh as an entry point with a default command to check the curl version.
Each step in the file corresponds to an image layer. Some layers, however, are more concrete than others. Containerfile commands like ENV, ENTRYPOINT, EXPOSE, and CMD create empty layers as they make no changes to the filesystem. They are stored as the image config and only provide container configurations at runtime.
So in this case, only the FROM, COPY, and RUN commands create new concrete image layers.
There are several tools we could use to perform our builds. We will be using buildah. Install it with this command.
sudo apt install buildah -y
Buildah is an open-source tool that facilitates building Open Container Initiative (OCI) container images. You can use it to build, push, and pull images and even run containers.
# Let's write a Containerfile.
# We’ll use the example above
# … insert content of containerfile followed by
# EOF (End of file) marker when you’re done
cat <<EOF > Containerfile
Now let’s build our image. In the same directory as the Contianerfile, run the following commands.
# Build an image and tag it
buildah build -t container-image
We can run the image like so,
# create a container and name it
buildah from --name container container-image
# run a command in the container like `docker exec`
buildah run container curl --version

Buildah requires you to pass command arguments to the run command else an error will be thrown as can be seen in the image below.

To get around that, we can use podman or docker which uses the default command specified in the Containerfile. Using Podman produces the expected result as seen in the image below. Docker also behaves the same way (you'll have to rebuild the image with docker though. It stores its stuff in a different location and so can't see the images built by Buildah).

So, That’s how the Containerfile works. Buildah and Podman recognize the Containerfile by default while docker recognizes the Dockerfile by default. If you want to use a name that is not the default, you need to tell them by passing the -f flag when building.
Podman is a tool for managing OCI containers and pods. It is feature-packed, rootless (container user does not have root privileges outside the container unlike Docker), and can be used as a replacement for Docker. You can even use it to write Kubernetes pod manifests because it can create pods (Now you know why it's called "Pod"-man). It uses buildah as its build tool under the hood (hence why it can see images built with buildah). It does not require a daemon like Docker (dockerd).
Building Images Manually From Command Line
This is not typically used but there are niche cases when you might want to build images in this way using the CLI like during testing.
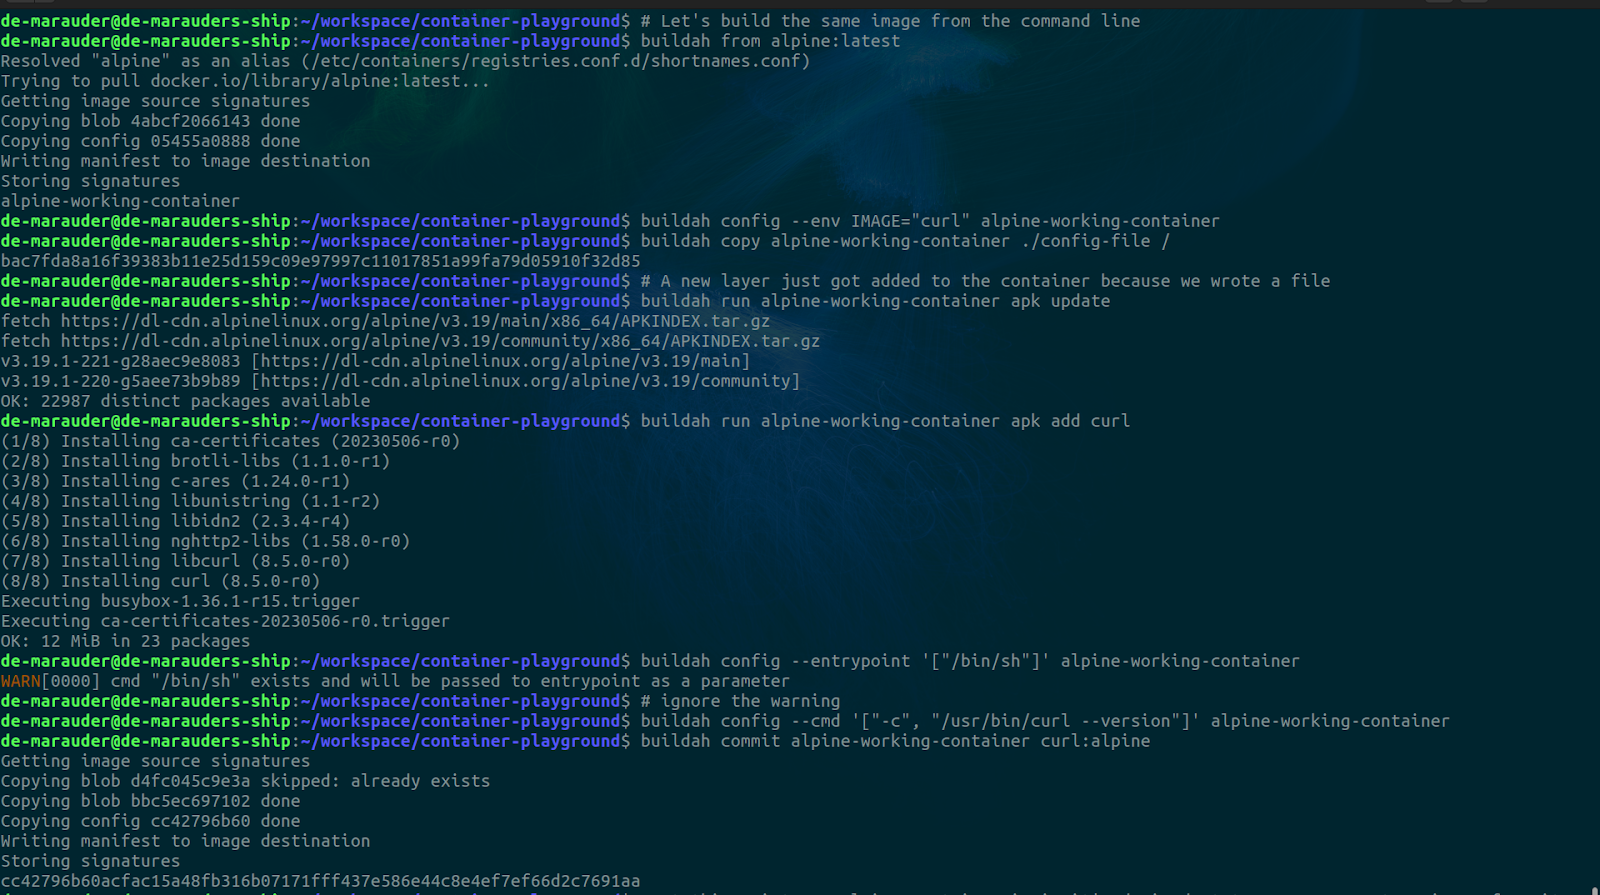
We will be recreating the same image from the Containerfile using this method. Here are the relevant commands
# Let's build the same image from the command line
buildah from alpine:latest

buildah config --env IMAGE="curl" alpine-working-container
buildah copy alpine-working-container ./config-file /

# A new layer just got added to the container because we wrote a file
buildah run alpine-working-container apk update
buildah run alpine-working-container apk add curl

buildah config --entrypoint '["/bin/sh"]' alpine-working-container
# ignore the warning
buildah config --cmd '["-c", "/usr/bin/curl --version"]' alpine-working-container

# At this point our alpine container is in it's desired state so we can get an image from it
buildah commit alpine-working-container curl:alpine
Running this set of commands will produce an image identical to that created from the Containerfile.
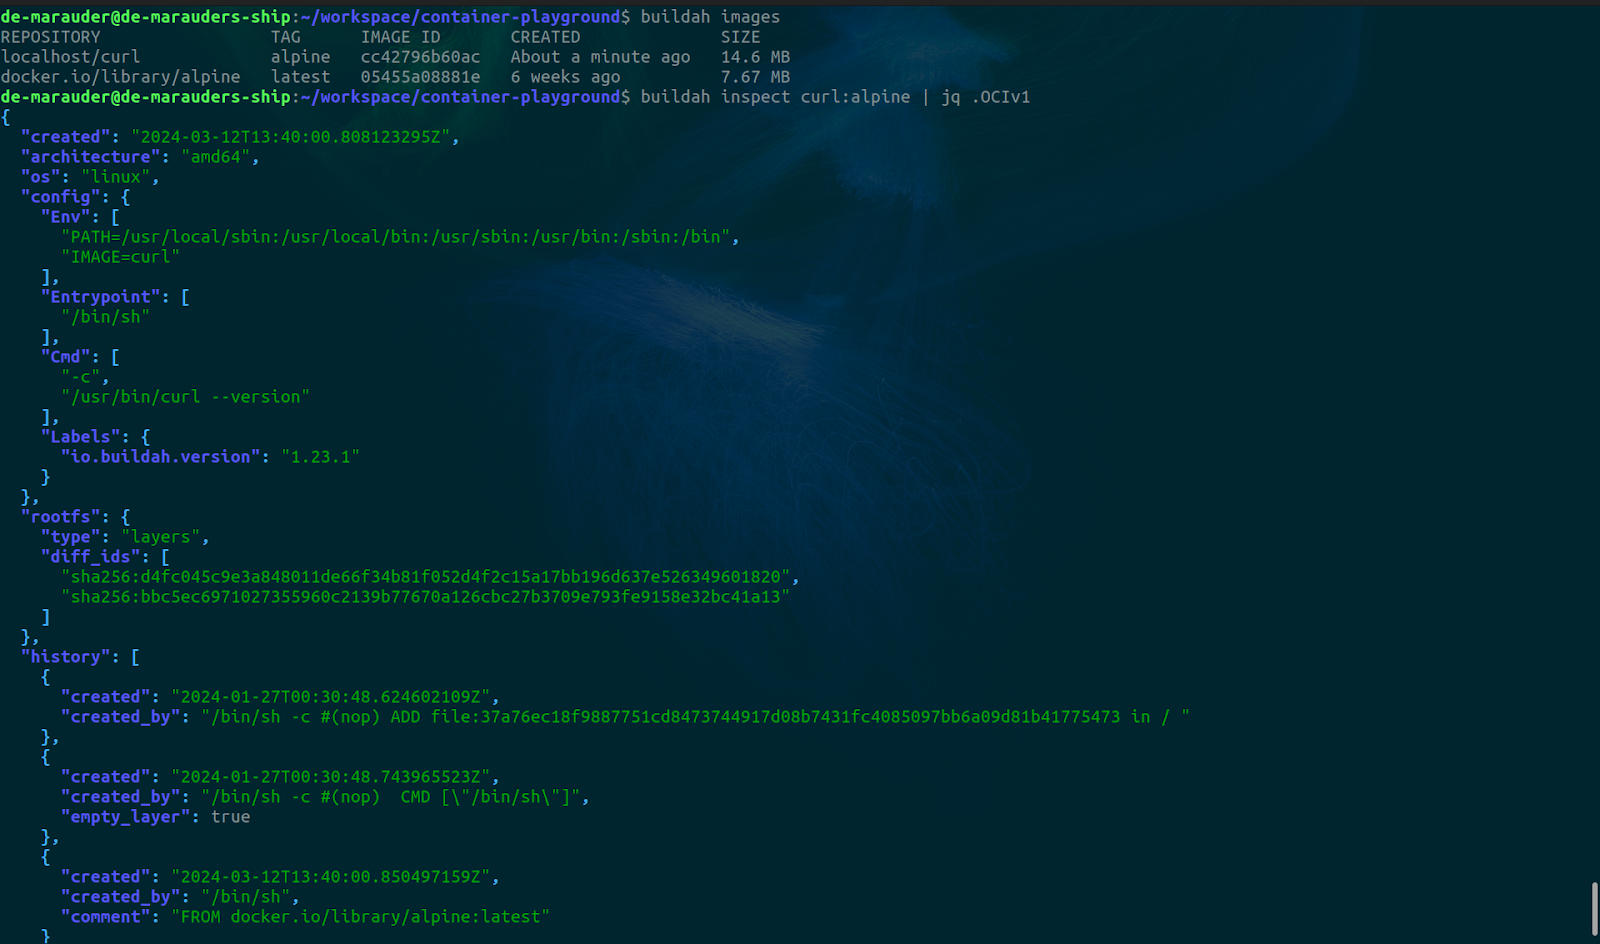
We can verify our build was successful by running the following.
buildah images
buildah inspect curl:alpine | jq .OCIv1 # you need to install jq for this
If we run the container now using Podman, we get the same output (the curl version)
podman run --rm curl:alpine

This is similar to what happens behind the scenes after the Containerfile is parsed. Each layer of the Containerfile is built individually.
You can also use other tools like Docker and Podman to create containers.
The Container Filesystem
The container filesystem is a product of composing the content of the different image layers according to OCI specifications to provide a unified view of the filesystem for the user. This is handled by a containerization tool whose job it is to find and parse the image spec, download the image layers, and stack them appropriately on top of each other to provide the final merged view of the image for the container.
The stacking of layers is done in such a way that the image layers are read-only. When a container is started with an image, another new empty layer, the container layer is added on top of the image layers as a read-write layer. This arrangement allows for the deduplication of image layers on the host as multiple containers with image layers in common can share them without worries of them being changed (since they are read-only). This is very important for efficiency when considering the resources especially storage available on the host.
The container layer created on the image layers when the container is created is initially empty and a merged view of the image layers is read and presented to the user as the container filesystem.
Copy on Write
Whenever an operation that would cause a change to the container filesystem (a write operation) occurs, the container tool performs a copy-on-write (CoW). It traverses the image layers downward to find the file being rewritten or created.
In the case of rewriting files, the file is copied up to the container layer once it is found and all changes to it are done in the container layer leaving the image layers unchanged.
File creation also follows the same procedure except that the file is not found during the traversal for the CoW operation (still has to be done because there is no way of knowing beforehand that the file doesn't exist in the image layers) so the new file is just created in the container layer.
For File deletion, the file to be deleted is searched for in the container layer. If it is found it is marked as deleted by turning it to a whiteout file. If it is not found in the container layer, the CoW on write operation is initiated to look for the file in the image layers, copy it to the container layer when found, and then mark it as a whiteout file. If it is not found in the image layers, an ENOENT 2 (No such file or directory) error is thrown. To find out more about the whiteout specification you can visit this GitHub page.

A storage driver handles the stacking of image layers. By default container tools like docker, buildah, and podman often use the overlay filesystem (overlayfs) storage driver to achieve this effectively. Docker previously made use of AUFS (a union filesystem) but has deprecated it in favor of overlayfs. This is largely because overlayfs is now innately supported by the Linux kernel since releases > 4.0 (See here for more information). Other options can be chosen depending on the type of image and the expected container workload. Examples of other storage drivers include btrfs, ZFS, VFS, and device mapper. We will focus on overlayfs since that’s the default and most likely what you’ll be using unless you're optimizing for heavy write-load containers.
OverlayFS
The overlay filesystem helps containers achieve efficiency by maintaining 4 directories for managing a container’s state. They include:
lowerdirwhere the composed image layers filesystem is kept,upperdirwhere the container layer is reflected,workwhere the container operations that should not affect the filesystem are done. Its contents are ephemeral (short-lived), andmergedwhere a unified view of theupperdirandlowerdiris presented. This layer is what is mounted by the container.
Let’s inspect this in a container to get a better feel of what’s going on.
Docker and Podman handle the tracking of image and container layers similarly. While Docker keeps its storage in var/lib/docker by default, Podman keeps its own in $HOME/.local/share/containers.
We’ll focus on docker for this example. I have opened up the docker directory in vscode (you can use your favorite text editor). You might also need superuser privileges to open this directory.
Before we begin, I advise you to remove all previously existing docker images and containers to make this procedure easier. (You should run this exercise on a VM you can dispose of later if you can).
# Don't run this if you care about the containers their images, volumes and network objects
# They will all be forcibly deleted
docker system prune -af

# run vs code as superuser
sudo code --no-sandbox --user-data-dir $HOME /var/lib/docker/
What we are trying to accomplish is to trace how docker stores a container filesystem. We’ll be tracking the contents of the following directories containers, overlay2, and image/overlay2
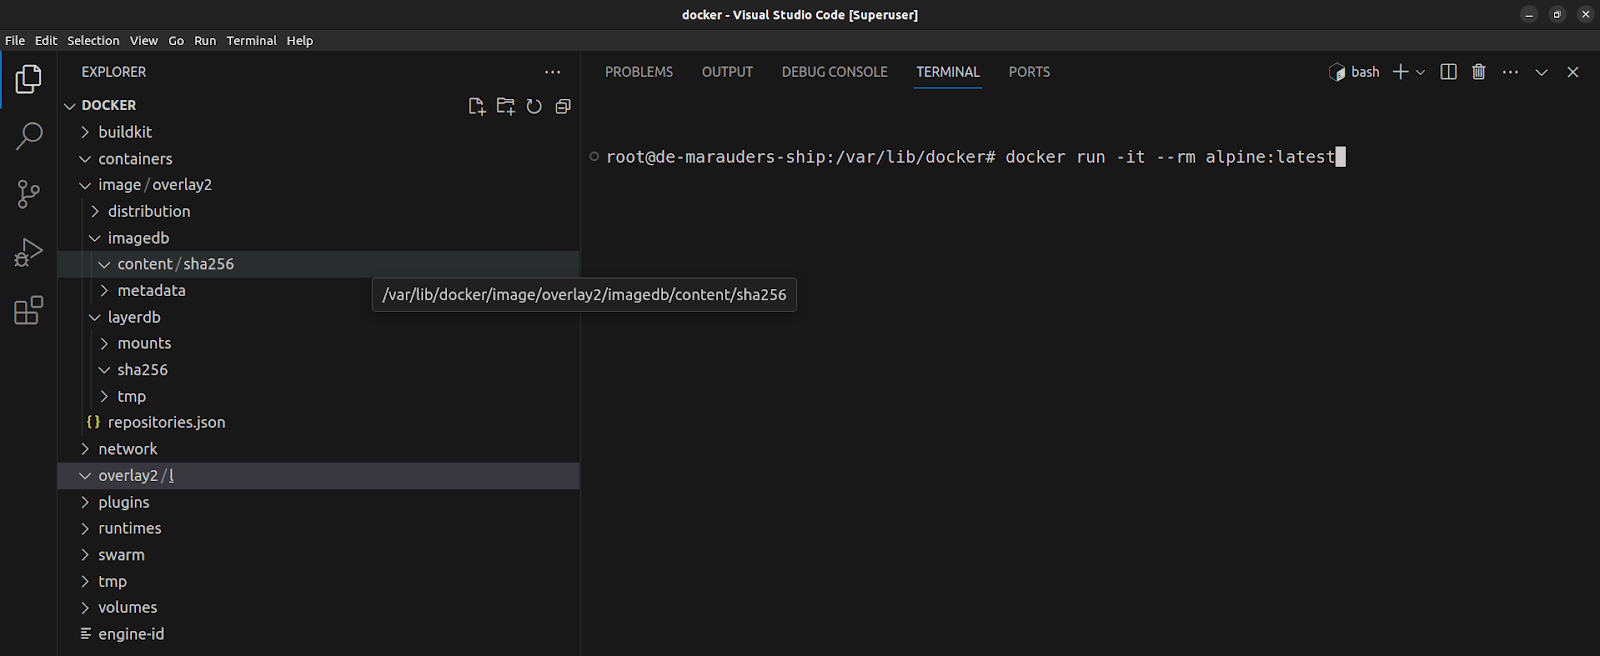
Let’s run a container and begin our hunt.
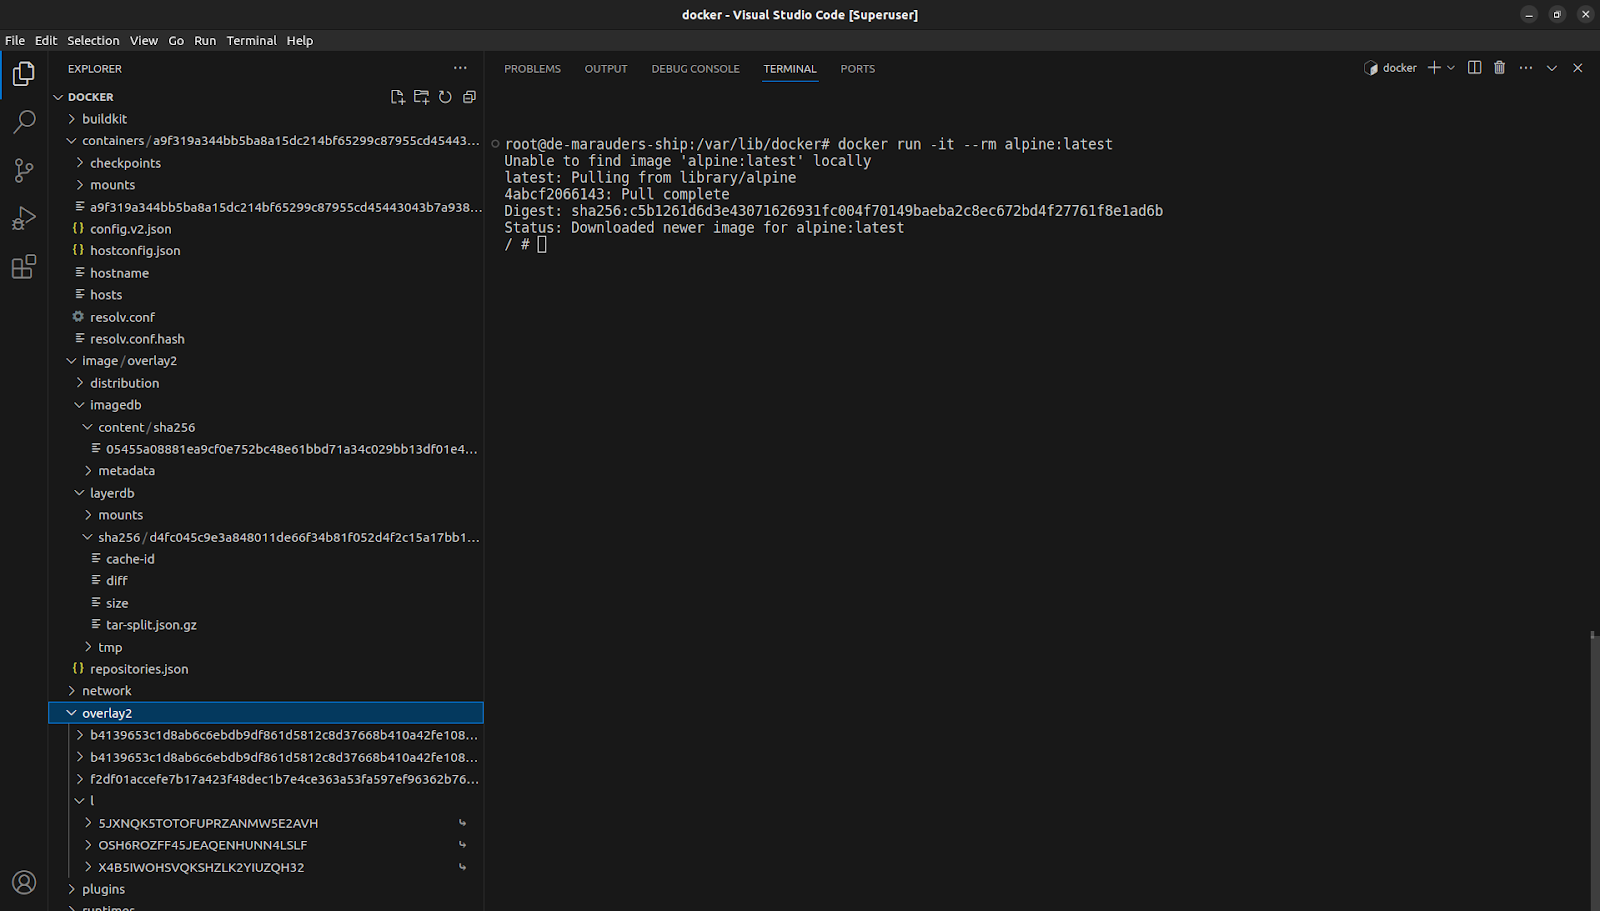
docker run -it --rm alpine:latest
After pulling, we can see that these directories which were empty for the most part are now populated.
So where do we start the chase?
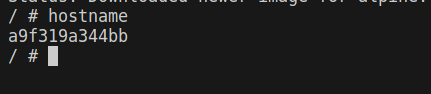
The first thing we want to identify is our container. We can do that using the container ID. Running hostname in our container spits this out.
Your first instinct now is probably to check the containers directory but you’ll only find the container logs, mounts, checkpoints, and other container environment configurations there. What we are interested in is where the filesystem is. The quickest way to find out is by inspecting the container’s graph drivers (storage drivers). Open up another terminal and run,
# swap your container ID
docker inspect a9f319a344bb | jq .[0].GraphDriver
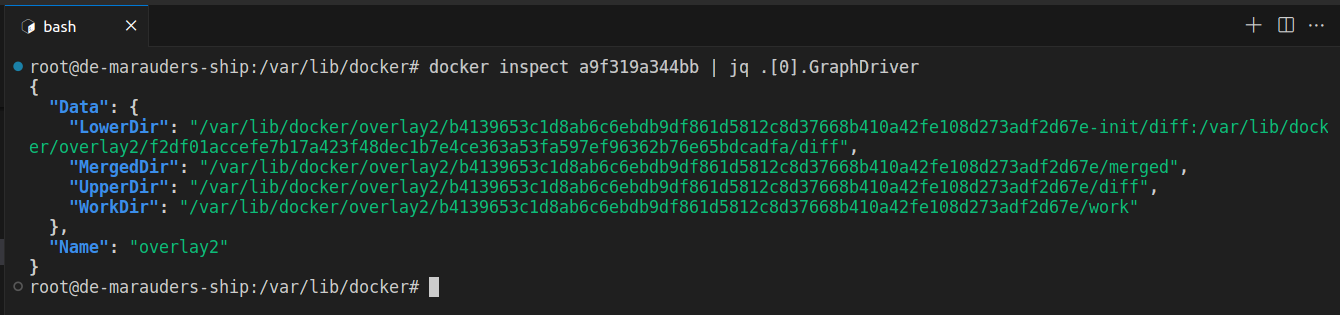
You can see the type of storage driver being used and the 4 different directories being used to render the filesystem.
Let’s walk through these.
The LowerDir field shows two directory paths delimited by a colon (top layer first, bottom layer last). This tells us that two image layers are being composed to give us this directory. Let’s view both of them.
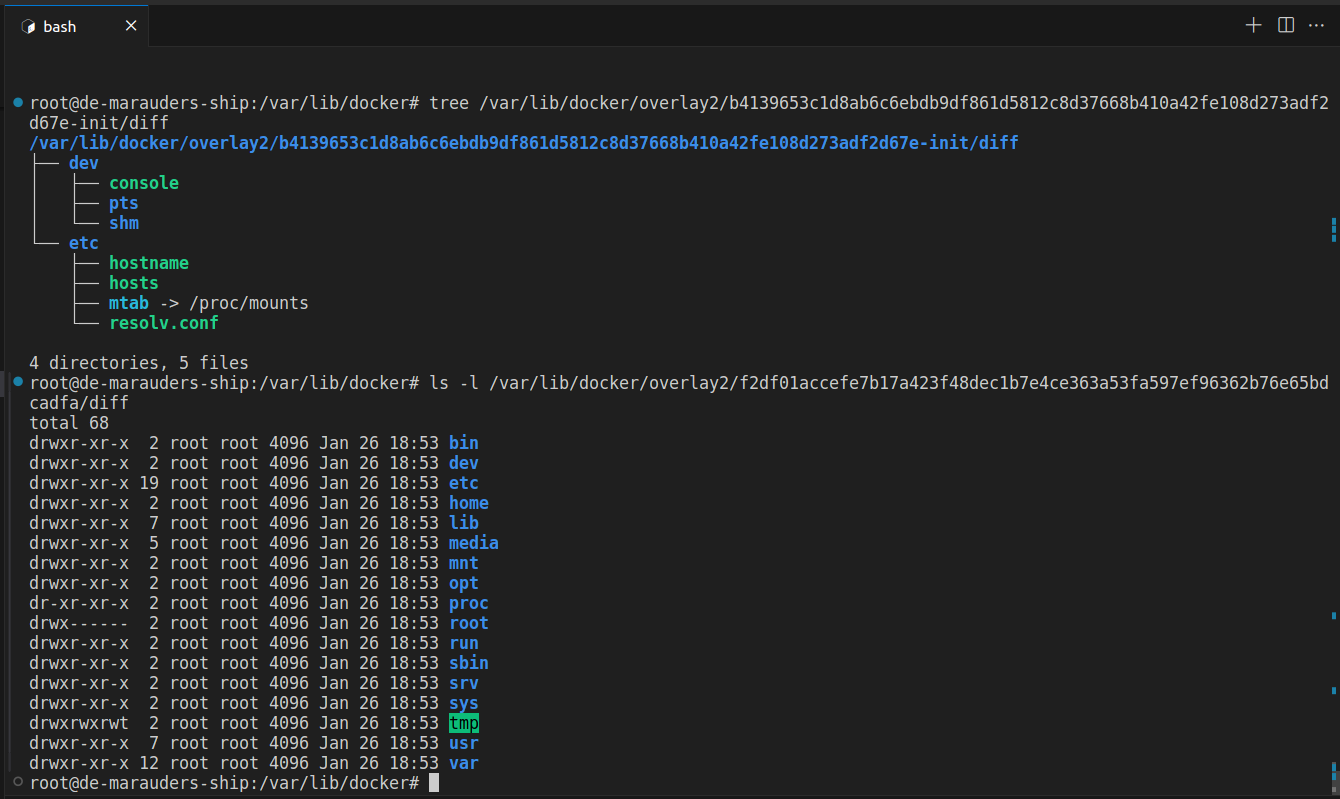
You can tell the order of the layers by inspecting their contents. The /etc and /dev folders in the first layer contain additions and overwrites to the previously existing ones in the 2nd layer (actual Alpine image layer). The first layer (top layer of LowerDir) is created by docker when the container starts to transfer different configurations depending on the arguments to the run command. That is why it has -init appended to it. You’ll notice the hash is the same as that of the container layer in UpperDir.
Inspecting UpperDir with the tree command, we can see that there are already changes to the container layer and they are in the home directory of the container superuser (root).

This file was created because we passed the -it arguments to the docker run command which gave us a shell to access the container. It tracks the command history of the container shell.

Remember we first ran hostname to get the container ID. Since then, I’ve also run some commands inside the container as seen in the image above.
The WorkDir appears to be empty and rightfully so as its contents are ephemeral only existing while work that affects the file system is being done in the container.
The MergedDir is the result of the overlayfs driver composing LowerDir and UpperDir. Inspecting it shows all contents of both directories present. This is the view mounted as the container filesystem.
If we check the current mounts on the host using the mount command, we can also find the container filesystem mounted as an overlayfs.
mount | grep overlay

Docker makes use of the overlay2/l directory to provide links to the layers so that containers can simply link to them and share them in that way for efficiency.

The links are defined in the directories corresponding to the layer hashes used by the containers.

Mounting a Custom OverlayFS mount
You can mount your own overlayfs filesystem on your VM using the mount command and get the same behaviour.
First you want to be sure that you have the overlayfs modules in your host kernel
lsmod | grep overlay

If the result is empty, you'll have to update you host's kernel to continue.
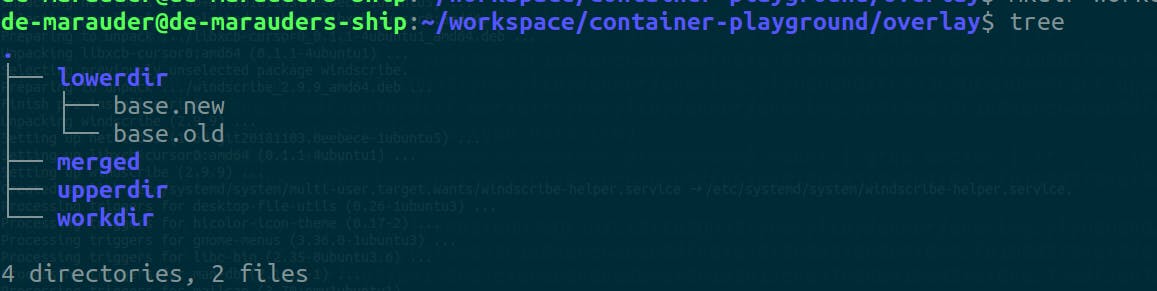
Next we create the necessary directories
mkdir lowerdir upperdir workdir merged
# We can populate the directories
touch lowerdir/base.old lowerdir/base.new
You can open another terminal and watch the tree command on the current directory to see how the updates reflect on all directories.
watch tree
Then we mount the directories
# First we'll create a new mount and user namespace
# because I don't want it to affect the host mount namespace
# I don't want root privileges on the host in the new namespace
unshare -mur
# Then we mount and check the content of one of the files we created across all directories.
mount -t overlay example-overlay -o lowerdir=lowerdir,upperdir=upperdir,workdir=workdir merged
cat lowerdir/base.new
cat merged/base.new
cat upperdir/base.new

Notice how only upperdir throws an error when I try to read the content of the base.new file we created in lowerdir from upperdir? That's because only the merged directory can read from both lowerdir and upperdir. upperdir is independent from lowerdir and is simply the first place the merged looks for things in.
If we make a change to it, let's see what happens.

Writes on merged are only reflected in upperdir (CoW in action).
If we create a new file,

We can see once again that the changes are only reflected in upperdir.
Limitations of OverlayFS
The main limitation of overlays is that it is not suitable for heavy write loads as might be seen in cases like database containers or images with a lot of pre-existing content. This is because the cost of the CoW operation increases as the write load increases. Even though the CoW is done only once, for each file, it might not be enough to offset the requirements for heavy writeloads.
That’s all for now folks. That’s how docker handles its image and container layers. Like I said earlier, Podman does something similar also you can play around with it and figure it out!
The docker commit command (as well as its equivalent in podman) work by turning the container layer into a new image layer that can then be used by another container.
Conclusion
The purpose of this article was to demystify the lore of container images. We’ve been able to dive into what container images are and how they work. We reviewed different tools while using them to interact with images. We also talked about image layers and how they can help us optimize our image builds and container storage efficiency on a host machine by sharing common layers between containers. We also saw how containerization tools like Docker handle the composition of different image layers to form a container filesystem using overlayfs.
I hope this article was insightful and helped you understand containers a bit more.
If you’d like to delve deeper into the topics discussed, I’d recommend the following resources
